


Just a friendly reminder to those with or soon getting wonderful painted valve covers. watch the front screw used to secure the hood center fake vent. with the hood closed it gets very close or could just rub your valve cover. I figure mine was from the spirited driving on the North GA funfest weekend. Just a very small a scuff. Should be easy to fix. For now that from screw has been removed until I can do the required mod..
Friendly reminder.. protect your engine bling
-
-
RD, is that blemish near or on the front most top portion of the valve cover? What is a good fix for preventing this from happening? Right now, my stock valve cover shows no signs of rubbing or contacting said screw.
-
This is from a post on the "other" site.
"Auto Zone, bought a pack of black trim screws (they come in an assortment pack of #8 and #10). These look like wood screws with trim washers attached. I used a #10, removed the trim washer, and cut the point off. It is exactly the same size as the #10 torx screw that it will replace but it fits flush with the plastic. It still holds the vent down and will not touch the cam cover"
-

RD, is that blemish near or on the front most top portion of the valve cover? What is a good fix for preventing this from happening? Right now, my stock valve cover shows no signs of rubbing or contacting said screw.
1) Make sure all three hood pads are secure and the center bracket isn't bent
2) Refrain from slamming the hood
3) Replace said screw with one that has a flatter (thinner) head
4) Inspect motor mounts
5) Check hood hinges for proper adjustmentThese are just a few off the top of my head I'm sure others may have more suggestions
-
@Slunglow, thanks for the edification. As well, thanks for the additional info @Mr. Clean. This forum never ceases to amaze me!!!

-
@Mr. Clean yes, sorry a more flat screw should do the trick. My first SS didnt make contact so I totally forgot orgot about the issue. For the moment I have removed that front screw just to be safe. Trim is ok for now (front screw to be removed for only a short time)
-
Good info @Ruptured Duck thanks.
-
My Fake vent has been held in place for a year with 3m double side tape , remove the screw and toss it away. I also cut down the plastic tit (your welcome tripod) thing to gain even more clearance.
-
-
@Tripod
he said "TIT" he he -
Display More
Just a friendly reminder to those with or soon getting wonderful painted valve covers. watch the front screw used to secure the hood center fake vent. with the hood closed it gets very close or could just rub your valve cover. I figure mine was from the spirited driving on the North GA funfest weekend. Just a very small a scuff. Should be easy to fix. For now that from screw has been removed until I can do the required mod..
Damn the screws! Even though rust would not be an issue you could get some touch up paint (which is one step enamel) in a corvette red crystal to hide that mark!
-
I'm being patient.....patient.....patient
-

I'm being patient.....patient.....patient
Hahahahaha!
-
-
@Painter thank you. Was wondering if there was an off the shelf match. Like I said it's a scuff and will be hard to see when fixed.
It is not a perfect match but should be close.
-
@Ruptured Duck our '16.5 cannot be fixed with just a shallower headed screw. As you know our hoods sag in the center. You need to get the original center support bracket or do @Painter s 3M tape thing.
-
Even the flat screw replacement is not a guarantee... dealer replaced my cover under warranty as the screw had almost worn a hole into it. I then replaced stock screw with the flat screw. I noticed the other day that a scratch had appeared again. Its a minor scratch, but still noticeable. Checked bracket and found it bent. I asked the dealer to replace the brackets/pads with the new style bumpers (there is a Polaris Team Memo on this) and they did. I decided to purchase the Jmod clear cover, so that has taken care of this happening again.
I agree, remove the screw, 3m tape that sucker down.
-
-
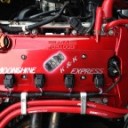
got home and removed the vent panel to see if I had clearance. Maybe an 1/8" at best but enough to counter sink the hole a little and get a stainless steel counter sunk head screw. Its close but I think I should be OK. Will monitor and fix further if needed.
Picture makes it look a lot closer. Basically it is just confirming that the screw is the cause
-
Has this happened to anyone?
Came home to find rear deflector had fallen off. I was surprised that they are glued on! The temp today was almost 100 degrees, I think it melted and slid off!
