
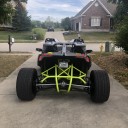
I know some of you would like an update here it is, finished product 😂😂
......damn is my cell hacked or do i really see shyt spinning around in circles ![]() ........
........


 SlingLow and 10 others like this.
SoCal, EjFord and Frankie55 like this.
EjFord likes this.
MADDMOE likes this.
FunCycle likes this.
MADDMOE, 3GunSteve and Seaham358 like this.
MADDMOE likes this.
SoCal likes this.
MADDMOE and Islandshot like this.
MADDMOE likes this.
SoCal likes this.
MADDMOE and EjFord like this.
EjFord and 3 others like this.
roadog1aj and 6 others like this.
mytoy and EjFord like this.
SlingLow and 10 others like this.
SoCal, EjFord and Frankie55 like this.
EjFord likes this.
MADDMOE likes this.
FunCycle likes this.
MADDMOE, 3GunSteve and Seaham358 like this.
MADDMOE likes this.
SoCal likes this.
MADDMOE and Islandshot like this.
MADDMOE likes this.
SoCal likes this.
MADDMOE and EjFord like this.
EjFord and 3 others like this.
roadog1aj and 6 others like this.
mytoy and EjFord like this.


I know some of you would like an update here it is, finished product 😂😂
......damn is my cell hacked or do i really see shyt spinning around in circles ![]() ........
........
I designed and made (3D printed) some sewing guides; this is the next phase of testing.
.....so thought I would begin working on replacing all the rest of my LEDs with the COB dotless LED strips and that means removing my wheel rings & found out that my rings are broken.......now this is the 2nd set that broke on me , 1st set was from a different company and i'm not sure why this keeps happening BUT i'm in the process of ordering new rings now from a 3rd company because i have no choice, already have my led strips, so im on pause again til parts arrive.......I do know one thing, I cant be the only one who has had broken led rings on the wheels, so it is a issue......
I would think vibration is the culprit along with lack of reinforcement on such a small area.
Perhaps on the new ones gusset or strengthen this area prior….?

I would think vibration is the culprit along with lack of reinforcement on such a small area.
Perhaps on the new ones gusset or strengthen this area prior….?
.......thats exactly what I'm thinking, when you factor in the weight of the strips & Vibration.......because the first set I had from a different company had the same effect. So now when I get my new set I'm going to have to add something to strengthen the area around those bolt holes.......the first set that broke caused the ring to actually scratch up the inside of the wheel ( first set of wheels I had on it )....so this is a serious issue for me....
OR save yourself, the expense of a new set and glass in or make an extension on the ones you have….
A 1/16” piece of aluminum fashioned to the back of what you have drill your hole and you’re done. Just a thought.
OR save yourself, the expense of a new set and glass in or make an extension on the ones you have….
......i thought of taking it to my welder friend who did my exhaust but i dont have any further TRUST in em, so they have been tossed out already......ill start with a new set i have my eye on from another supplier but i will reinforce them b4 they get mounted, even if i have to add longer bolts but this will not be a reoccurring issue for me now that i see what the problem is
What is this? Why would there be a cutaway? It’s such a crucial point?
A 1/16” piece of aluminum fashioned to the back of what you have drill your hole and you’re done. Just a thought.
....thats exactly what i was thinking but im going to add a plate on both sides of both the upper & lower mounting hole, maybe something just a little bit thicker and longer bolts and I should be good than....because the space between the arrows has failed on me twice
What is this? Why would there be a cutaway? It’s such a crucial point?
.....that D means drivers side, P on the other means passenger side......
Super glue and baking soda is an incredible adhesive AND can be sanded smooth immediately. This process is used to repair chips in helicopter blades because of its durability. I have found many uses and applications for this.
just spitballing here….

.....that D means drivers side, P on the other means passenger side......
ok BUT not the best place for it I would say….
At a stress point????
Fill a void with baking soda then drip some super glue onto it OR the opposite procedure for the repair. You cannot mix and apply. It hardens immediately.
.....i'm going to try these this time, but reinforce the mounting holes on both side with brackets to remove some of that stress from the bolts....thank god this is winter, i have nothing but time.....
Perfect
Time is a gift
THREE contact points is key. This in of itself may just be the cure.
THREE contact points is key. This in of itself may just be the cure.
.......that hole at the bottom is not a mounting hole, that's just there.....nothing to mount it to......the only mounting points is the 2 bolts for the calipers.....the first set I had did have another mounting point on those rings at the RED ARROW and also the caliper bolts but that ring also broke and was tearing into the inside of the rim
.......today wasn't all bad , i got a chance to repaint my calipers with Dupli Color Caliper Paint and the kit came with some brake cleaner which allowed me the chance to knock out 2 birds with one stone......
.......ok so my rings came yesterday & of course I couldn't wait to begin another MOD , i bought these metal straps from home depot along with JB Weld that I used on both sides of all 3 rings mounting holes.....i also got some washers & longer caliper bolts ........all this in hopes that there won't be a 3rd time my rings break because I might remove em all together if it happens again....I'm painting black tomorrow, Wednesday I'll lace em up with new leds and hopefully by the end of the week I'll be done with all my leds
