


I am still running @rabtech original's. But I will be getting the full set at a later date.
Posts by FunCycle
-
-
Yes, I like it. GREAT JOB
-
Yes, I know. If I had to do again, I would have prepped the scoop on my top myself to get rid of the scratches and stuff.
-
Black would be good but I think the color one would be better. The white text sticker
-
Need my QA-1's done. When they get here they will be la natural. Don't know what color I want. I want something that will pop with the red SS and not red.
-
 Display More
I do sometimes notice the effect your talking about. It will actually repel the powder. I havent had that issue here but at my other garage it would do it 1 out of 10 times..
I alway off gas my parts that I'm spraying by bringing them up to around 300 degrees and then letting them cool down to around 100 to 125 degrees before I start spraying. That way I don't have anything on the part that would cause a bubble or fisheye..
I'll post up some pictures of the steps when I start later. It just like baking Toll House cookies only easier...
Also forgot to mention that you will need a IR temp gun. Just don't drop lacquer thinner on the temp gun display.
 It makes it a bit difficult to see..
That also goes for a lot of electrical & contact cleaners. They will do the same thing
-
@FunCycle I wasn't sure either until I did the installation. I think 1-1/8" would allow the mod to be done with no additional spacer needed.
The last thing I will be making (not really needed but wanted) will be a backing plate for the poly bushings. the factory mount is narrower than the bushings allowing about 1/8" overhang of the bushing. a simple plate with drilled holes to match the retainer and as wide as the bushing will cover the surface area. It would be sandwiched between the frame mount and the bushing.
I guess a big bushing kit could be made relatively inexpensive for the SS. sourced brackets and the addition of the wider backing plate and you have an upgrade.
I have to ask. Do the current billet kits (with the wider bushing) have the same overhang on the back side?The DDM is shoulder to shoulder, the whole bushing is supported except for the lip on each side of the bracket. If that is what you are talking about. You are right, from your pictures. You could use the nut offset with a spacer to clear the link or you could use the link center for clearence without a spacer. I would just clear the nut and use the spacer to clear the big end on the link
-

Buddy, its a gift from us to you!!

 Got about 3-4" here, but raining and melting now..
Oh man! I will enjoy riding today @ 78 degrees with the sun shinning.

-
Doesn't look like a great day to ride here ☹️️Looks to be a little cold there today. We will have 76 -78 degrees and sunny today. Full tank of gas so it is time for a ride.
-
spacer applied to the back side. Also installed my $9 collars to the sway bar.
Note: I know the bolt is shorter than what I want with this spacer. A longer bolt will be installed if I keep these spacers.
Good job there and a cheap mod. Every little bit helps. I did not think about the large ends on the links.
-
Thank you for your order! I just refunded the "ShockingStuffer" discount amount to you.
Thanks Bill, we will probably meet up one day
-
I just ordered the QA-1 but forgot to add the discount code 'shockingstuffer' in the checkout
-
Pushing 80 degrees here on Sunday, I plan on riding about all day.
-

Just a phone call away bro!!
What are you going to do, hand him the drinks???

-
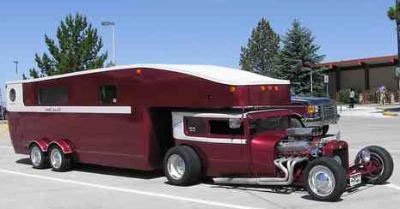
Different paint but pretty sure the same car. The first time that I saw it I think was around 1989-90 at the Frog Follies in Evansville. I did the Frog Follies for about 10 years. I us to stay on the grounds and help them set everything up for the show. Even went to one of the E-ville Iron club meetings back in the day.
-
That must not have ever caught on - never saw a camper like that ever
There us to be a set up just like it that showed up at the street rod shows years ago. The car was about a 34 ford sedan, trailer hitch was mounted in the center of the roof. It pulled about a 25 foot camper.
-
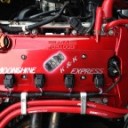
Their instructions do list removing the ECM and using a certificate they include with kit to send in for tune. Read through and it seems to be the most complex installation of the 3.procharger-super-charger-slingshot-install.PDF
What is the price
-
Like I said, size wise also. Race car stuff for one. I have a small fuse panel I installed years ago in my Hot Rod (12 circuit)
-
Just a question. Why not one from the auto/truck after market with more outputs? It is out there with anything you want.
-
The first thing I did was look for 4 cylinder anything, did not find
