**Disclosure** To my Turbo friends, God Bless you and your horsepower. I wanted to go the natural aspirated way. This posting is in no way a means to say this is better or worse. I am a tech geek, and not a mechanic and found this to be safer turbo alternative horsepower fun
I love these forums and did a lot of research on the engine and from my own experience building my 72 Chevelle. I wanted more torque and horsepower but don't have the free $6k+ to do a turbo right and all the other things I want to modify. I found the guys a @Rist Rocket Racing and they had what I was looking for. Put more air in and let more air out. Bob took care of the tune to put more fuel in. So this boys and girls equals TORQUE/HORSEPOWER.
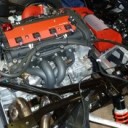
Here is the patient 2015 SL.


I have plans for plenty of other mods, hence freeing up cash for looks and horsepower. The @Rist Rocket Racing guys speak my language when it comes to porting and polishing to allow more CFM Air in. They have a really nice machine shop.
The box arrives. Getting excited, but know I will need drugs after all the bending over the Sling. You know what I am talking about.

I like the CAI's out there, but agreed with Nathan about the, "Why Not Just Use...." I bought new parts for my mods so I can keep my old parts for a few reasons. But doing this I can really show you the difference between stock. To save money you can send them your parts to port and polish instead. But I was surprised how little it was for new parts.
The Air Box:
I like how they created more air holes with nice vents. But they take it further. Look at the bottom snorkel and then the top snorkel. Notice anything? They opened up the whole bigger to allow more air through, and also ports the inside and polished it so there are no ridged or imperfections on the front.

Now flip it around and the did the same port and polish on the outlet connecting to the pipe. All equals more air. Using a K&N Air filter.

Up close to the ported rear outlet.

This connects to the new throttle body through their custom made intake chrome pipe. Everything fit perfect. On the box you use your stock clips and bolts.

This connects to the new ported and polished throttle body. Some where on the forum they post their CFM bench tests, but you can see here. Can you tell which one is the stock one? Pretty easy to tell the one on the top has really thick walls. Also notice on the porting how they get rid of the ridge in the middle. See it? That changes the air flow. Better to have a straight shot. The porting made the opening wider without sacrificing any strength.

Another shot. The stock one on the left really shows how they cleaned it up.

Now flip it over. Again you can see the port and polish job they do. smoothed out the ridges.

Super easy to swap out. 4 bolts and the wire harness.

Now onto the intake manifold. At first I was intimidated to do this not having schematics or a Chilton's manual. But it was easy. Remove the line of bolts on the top row connecting to the block, a wiring harness, and as you take it out, underneath there are some wire ties holding onto a wire connected to the alternator. That was the only pain. But first lets do our comparison to stock
Intake:
Your looking at the hole and mount that the throttle body goes onto. The RRR ported and polished is on the???? Again easy to tell. They really modify this. Shave down the side walls for more air and all together remove the two half circles on the bottom.

Now flipped over check out the intake runners. Again easy to tell which it which.


Intake side all buttoned up and pretty. Was surprised with some sockets and wrenches how easy it was to swap.

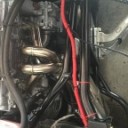
Now moving onto the Exhaust side I went with the tried and true 1320 header and the Alpha Electronic Exhaust.
Below is UGLY!!

Time to tear it down. Again very easy switch.


Installed the Alpha bracket and Exhaust first