Posts by ACarl84

    DDM hood vents installed tonight. Pretty easy job and of course top notch quality. Measure 100 times, then cut.


    Will take it for a test drive tomorrow to see if it stops the flappy fenders. If they still flap then it’s time for those fancy aero catch hood latches I read about. Now that I already cut the hood what’s a few more holes in it.

    Got the hawk brake pads in today, they’ve been sitting in my tool box for months now. Very easy job however I found that the lower caliper bolt on the passenger side was 1/4in loose...yikes! Here is a photo of how it was when I found it. I’ve never taken that bolt out in the 4 years I’ve owned the sling and the pads were original Polaris, so it must have been that way for a long time. All snug now!

    I got the angle drive brace installed last night and happy with how it turned out. At first I didn’t think it would fit without some grinding of the brace in order to clear the welter 2.5’’ exhaust but it worked out well. I found that I had not fully seated the middle joint so I was able to shift the pipe near the angle drive forward just a little bit to give enough clearance. I ended up removing 2 sections of the exhaust and it was fairly easy. Very happy that I put the Permatex between the pipe and the clamp rather than inside the pipe joint. A lot fewer colorful words were needed than I expected!

    When you get a chance, you can text (864-907-6004) or email - dave@ddmworks.com - over a picture of what your exhaust looks like by the angle brace and we can take a look at it also. I have a couple more Slingshots I am installing the brace on this week and 2 of those have the Welter 2.5" on them. I am hoping to get some better pictures then to show what has to be moved and how close the exhaust can be to the angle drive brace to help.

    Sure, I’ll send some photos of before and after install and I’ll let you know if I need to move anything else

    I’ve been waiting on this race for awhile, glad to see it’s a reality.


    I’m sure others are in this same situation, looking for advice. I have the Welter 2.5” and it’s installed with Permatex sealed joints. How difficult is it to remove the rear section of the exhaust with that sealant on there? How is that done, use a torch to heat it up? If it’s a real PITA then maybe I’ll skip the brace. Thanks!

    Reinstalled my ECU after having bob from OBD Diagnostics update the flash to hopefully reduce the smell of unburned fuel. I ended up having to find my USB Endoscope for my phone so I could look inside the bellhousing to make sure the ECU bolt I dropped didn't end up inside the bellhousing near the clutch. A careful look convinced me it wasn't there and I couldn't find it down near the axle used by the brake and clutch pedals, meaning I have absolutely no idea where the darned bolt went. I think I need to rig some type of cover where the hydraulic clutch line enters the bellhousing to make sure no bolts ever end up inside where they might somehow damage the clutch. When finishing my turbo install back in early 2018, I managed to lose the driver side bolt that secures the stock coolant overflow tank and it, too bounced over near that opening. I never found that bolt either! I'm curious to see if the new ECU update changes my mileage much and also am curious to see if the update reduces the exhaust fume smells.

    I also removed my front fender/mudguards and made a template to fill in the holes, but haven't finished the fill pieces. I'm using a 24"x24"x1/8" piece of black ABS and plan on installing the pieces with the rough side out.

    I lost the retaining nut on the fuel line inside the bell housing when installing the new fuel rail and supercharger. Took me along time just to find it in there but I was confident that’s where it fell. I could not find it with an endoscope through the large hole. I ended up taking the dust cover off the passenger side, putting a bent coat hanger in there and wiggled it around. I could hear the coat hanger pushing something around, Eventually the nut came out from under the clutch to an area where I could see it from the larger hole on the drivers side and grab it with a grabber tool. So...things can hide pretty well in there, granted the nut was much smaller than a bolt but still might be worth another look.

    wow!


    Can these people make up their damn minds?


    CDC now says coronavirus doe not spread easily from contaminated surfaces

    what we are all witnessing right now is the scientific process playing out in real time and in public view. It’s common place for scientists to refute one another or find different results on the pursuit of truth or scientifically proven and repeatable results. That’s how the scientific process works and it usually happens in scientific journals which no one reads but now it’s happening in public view. Be prepared more of this back and forth as time goes on but eventually we’ll settle on the truth.

    wickedwebby believe me, I’ve thought about the 4th wheel. It’s not out of the question but probably not in the near future. One kind of lame reason is I really like the size and shape of the SS for storing in my small 3rd garage stall. The single rear wheel allows for more toddler toy storage...but that need won’t be around forever.

    Goats_Hogs i’ve noticed a mileage drop that’s for sure but I haven’t kept track. I find that I end up PLAYING more often than not!


    I’m starting to find the sweet spots in 2nd and 3rd where I can get it hook up pretty well and I just pulls. I’m running a nitto 555 right now, thinking I will get a different tire later this summer. I’m looking at wheels too, maybe a 305 or 315 will get more traction but so far I’m happy with it.

    Looks really good, nice review.


    I know you said you were stopped, but when are you going to do the cams and smaller pulley? :)

    I’m sure that will happen at some point, as long it’s still reliable with a stock motor. Another 100 miles today and I’m starting to get used to the new power....so I guess it’s time for more

    I’m done with the install of the DDM Rotrex supercharger kit and I now have 200+ miles on it so I feel like I can write up a review.


    I ordered this kit during the Black Friday deal last fall, took about 5 weeks to receive it which I thought was good given holidays. Then it sat in my basement to wait out the long cold MN winter. Occasionally (really multiple times per day, my wife will attest to that) I would go down there and check on it, go through parts again, make sure it’s all still there, just waiting for warmer weather.

    I gave in the first week of Feb and bought a garage heater....yay!!! Time for the install!


    the install took me several weeks of a couple hours here and there...doing a step or two each time I had a chance to work on it. I have twin toddlers and my wife is a tax accountant so I was working, being full time dad and trying to squeeze this in at the same time. The girls did help with tie wrapping some of the wires :). If I worked on it solid, I’d imagine a day and a half would be very doable for me. Only help I had was to remove the hood.


    The instructions were really clear, I did contact Dave@DDMWorks a few times via text and once over the phone to clarify a few things, every time getting a quick response that answered all my questions. The kit is really well made, designed and the fitment of all parts was great. I am probably average mechanical skills, maybe below average, and I was able to do it pretty easily. Just took my time. I did have to buy a few tools like a larger socket for the crank bolt, some shears to cut away the rear radiator shroud, grabbed tool and endoscope to retrieve a lost bolt in the bell housing (stupid mistake!) and modified an Allen key to get one of the bolts in that attaches the supercharger support to the front of the engine. I did not remove the radiator, would have been easier if I did that.


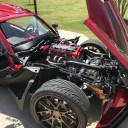
    Finally got it all together, worked up the courage to fire it up and took it for a first drive...it ran flawlessly!! It was really hard to keep the RPMs down for the first 65 miles of break in, which I finished the break in the next day. Once broke in I could let it rip...and this thing is wicked fast! Massive improvement over stock. I have had one quick car in my life (1995 Eclipse GS-T) but nothing like this, this is really my first true performance vehicle and it is so damn fun! I loved my slingshot since I test drove it back in fall 2016 and I love it even more now. The power is so smooth and pulls like a freight train. The blow off valve is addicting. I have the welter 2.5in exhaust as well and it sounds awesome across the entire RPM range. I smile and giggle like a kid every time I press the red button....heck I do it when I see it in the garage every morning!


    For anyone else thinking about adding a supercharger, you should do it! If you do, go with DDM, they make great products and stand behind them. I also have the DDM surge tank, fuel rail, sway bar, mounts and end links...maybe more I’m not remembering, they are all great products.


    Here are a few photos. I’m done with all the mods I want too do now...said no slingshot owner ever...time for wheel and tire upgrades!!

    MADDMOE

    What type and size exhaust are you running? I was wondering if you had to do any modifications to your exhaust being you have just installed the ZZP pinion brace. I have heard that a slight modification is needed if you are running the Welter 2.5” dual exhaust.

    I’m running into this issue right now. I have the welter 2.5in and I can’t get the pinion brace to fit. I don’t think I can move the exhaust far enough to make it fit either. I’d love some thoughts on mods to do to make this work. I emailed Kyle D as well to get this thoughts. Here are some photos

    I just installed an Innovate gauge now that I have the Rotrex super charger. I have about 90 miles on it now and worked well until the other day. The gauge is throwing an O2 E2 error which means the O2 sensor is not detected. I checked all wires and cables and all have solid connections. Could that error mean the sensor failed? I read that these sensors can’t be too far in the exhaust flow and I think that’s the case here. The bung on the 1320 header looks to be shorter than what innovate suggests. Any ideas how to resolve that?

    Welcome! I’ve learned a ton...and spent a ton of money...hanging out on this forum! Whereabouts in MN are you? I’m in Maple Grove. Working on my own DDM supercharger install right now and patiently waiting for warmer weather

    You can run a jumper across the pins in the fuse box where the fuel pump relay is. I do not have a picture now, but I can take one in the morning and post it up for you. A simple paper clip works perfect and with the key on the pump will run continuously. There are 4 pins for the relay, just have to make sure you get the paper clip in the right ones.

    that would be great, thanks Dave. You guys are awesome!

    rabtech thanks again for the suggestion. I must be missing something though. Is there a way to run the fuel pump constantly to drain the tank? Right now it runs for a few seconds each time the key is turned on then shuts off, it’s doable but will take quite some time to drain 9 gallons that way.

    ok, update on the lost fuel line lock nut....I GOT IT! Thanks for the great tool suggestions, they worked great. It was no easy task though, took me a couple hours of playing around but I got that little bugger out of there. Now to continue with the supercharger install!