 Display More
The factory pods have a black, yellow, and white wire at the connector, but the black wire is cut inside the pod. So, yellow is pos and white is neg
Hope this helps!
yep that helps! Thank you!!


Display MoreThe factory pods have a black, yellow, and white wire at the connector, but the black wire is cut inside the pod. So, yellow is pos and white is neg
Hope this helps!
yep that helps! Thank you!!

Just the driver's side? What about balance and symmetry?
Also, I know I've asked before, but... I'm interested in those if you aren't...
As for you question, Rab will know... He's the audio king! Great system, that isn't overdone, but done well and done loud. I want to grow up and be like him...

I tentatively found someone who can fabricate a replacement for those front stock pods. I was going to remove the drivers side and see how it felt driving without it first. If I like it, I was going to use that wiring to hook my new hump speakers to.
Nothing is ever as easy as it sounds.
The new speakers are also LED, and my lighting guy extended the wire with his own connector (since he will be doing all my lighting soon).
First, my channel lock would not fit in the gas opening. Run to Home Depot, get the thinnest one they have. Get back home, still doesn’t fit. Work it sorta sideways, and get the gas gasket-thingy off finally. Then finally get the original hump off.
Then that LED connector would not fit through the wire/drainage hole under the hump. Take the hump off, drill hole larger. Biggest drill bit I have was not large enough.
No file on hand that would work. Run out to HD again, get a file. File the hole larger but it’s hard filing fiberglass. Finally get the hole barely big enough and the connector goes through.
Takes a while to figure out how to fish the wires through. Gotta rig up a coat hanger hook. Finally get the wires fished through and almost taught, when they get stuck. Now the shrink tubing won’t fit through the hole. Argggggg
Try to stuff it through, now it won’t budge. Decide to leave the wiring stuffed in the hole. Then started working on taking the pod off. Then ran into the 5 different color wiring for the stock speaker and that odd connector junction.
Then realized I can’t leave the wires stufed in the hole as then the water won’t drain and probably the vibration over time will cut into the wire. Then I threw my hands up and quit. I thought I could get this installed within 30 minutes. Ha ha ha
So anyway, will go back at it tomorrow. I did it all backwards. Should have just tried to get the front pods off and see how that felt when driving first.
Those pods are wired into a large plug. If I can get that plug out I can test drive it tomorrow without having to cut the wires which I don’t want to do just in case I don’t like driving without them.
So after all that blah blah blah, why do you want someone’s stock pods??
I got my new kicker hump speakers in one side today. Then unbolted the drivers leg speaker pods which I am totally removing and leaving off.
I’m handy with tools but am not familiar with electronics.
The new speakers simply have black and red wires.
The stock speakers have a coupling harness. Three wires going in and out. Brown/red, brown/black, black going in - yellow, white, and black going out.
How do I hook up the new speakers?
I did search this forum but could find the specifics I am looking for.
Thanks for any help.... ![]()
I already talked to SlingMods.com about this. They are about the same. ![]()
@studiopeg... Will you be keeping stock pods? Thought I read somewhere that you didn't like the leg space they take... If so, let me know... I'm looking for pods!
What I'm installing are additional speakers on the deck hump. I really do not want those stock side speakers, but they have to stay until the day comes that there is a replacement for them to fill in the space. I would like a flat panel in there, but no one offers any such thing. I really hate those pods! They keeps my shifting leg at such an unnatural position.
Thanks, good suggestions. I'm going to tackle this tomorrow...........
 Display More
I mounted my amp under the driver’s seat as I had to feed front, side, and roll hoop pods.
It is fairly open under the back deck panel and Not to difficult to fish the wires to each side.
I ended up drilling a small hole in the corner of the cavity / well that gets exposed once you remove the stock panel under the roll hoop.
Kind of hard to describe but there are several routes to that area and places to zip tie the wire.
You may want to take the back panel off as well - will give you much easier access to that area.
Not sure if that helps.
Thanks. I was hoping for a step by step somewhere. I'll figure it out eventually.
I can put the pods in no problem. But need to find instructions on how to install/wire the speakers. Searched YouTube, found nothing ![]()
Thanks everyone, I have the day off from work tomorrow. Will check out all the suggestions here. I wish I had a lift in the garage!

Not sure if this will help but i beleieve it is what @Br4hm4 was explaining that while technically the same size tire - where the rubber meets the road (footprint) is different ..... 10" vs 11" in this case. Should you return them because it isn't what you want - that's up to you but it sounds like you should get what you wanted
Yes, the problem is the rim size difference.
As I mentioned, this guy should have told me the rear rim would be smaller than stock. He just assured me I would "have the same tire size." That's leaving some crucial detail out....
It does tick me off, especially because I specifically told him the SLR has a WIDER rear tire than the base models, and I wanted the tire the same width. I mean duh, that would include it looking the same width when mounted....
If he knew what he was doing, he would have understood and told me that because the rear rim doesn't come in 11" as the stock one does, the tire would not look as wide.
So I just don't think this is a battle I want to wage. The wheels are on, they are custom, they happen to look great, and the only glitch is that back width.
As long as performance doesn't change or suffer, I guess I will live with it. There are other battles to fight.
when you look at the new tire does it say 305 / 30R 20 ?
if it does then your stock tire should also fit on the rim
The new tire is 305 30 20 (I am not looking at it right now, but that's what he told me).
Same size as stock, right?
So I am in the dark about all this stuff. Trying to learn. Please be patient with me ![]()
The stock rim is 11". The new one is 10".
If the new tire is the same size as the old, why would putting the old on make a difference?
Doesn't the smaller rim size have bearing?

I wouldn't worry too much about it right now since you already have them and they are on the slingshot. Besides, if you're like the rest of us, you'll be replacing that tire during your next oil change anyway
But the company told me the tire on the new rim is the exact same size as my stock. It's the rim that is smaller.
So I cannot put a tire on there that will be as wide as my stock.
Or am I misunderstanding something?

So...based on the photo...the new wheels and tires are the ones in the photo that are wider than the rear? Depending on brand of tire, the footprint can be wider even though they are the same size. I ran in to an issue with that on my Firestones. The Stock Kenda had a wider footprint than the Firestone, even though they were both the same size. Also looks like you have an asymmetrical tire on the rear...why not just get another tire for the rear that matches the new fronts? If they are all the same size, there won't be any issues.
No, the new wheels/tires are on the sling already. The wheel in the foreground is my stock one. Wider.
He's just told me the problem: "That wheel only comes 20x10 rear if thats what you were referring to. But it still has 305 wide tire on it. They dont build that wheel in an 11" version"
Why didn't he tell me that when I ordered them from him. I would have picked different wheels then. Sigh.
I am confused. I am assuming that your stock tire was/is a 305 / 30R 20 and that you decided to change your rim size - you say you bumped the fronts to 20's did you also increase the rear rim size and what size tire did they send you for it. there is a tire size comparison calculator here tire size where you can enter the 2 sizes to see how close they are
I didn't change anything about the back, just the front.
Stock fronts I am told are 18. I bumped them up to 20. They look fine.
Rear I left the same.
305 30 20
The company is telling me it is the exact same size tire.
I have asked him, then what's the problem, what happened that it's not the same width. He knew when I ordered the rims that I wanted the widths to stay the same.
What kind of difference is it going to make having a less wide tire on the back?
It was a disappointment after being assured that the new wheels would match the stock in width. I bumped the fronts up to 20s and they look fine. But I'm disappointed in the looks of the less wide back tire.
Gotta pick my battles. Not sure if this one will be worth it.
More the you buy, the more your trouble!


You are the most helpful guy Sam! Yep, no electronics training here so best that I ask questions and gain knowledge so I can do these mods correctly.
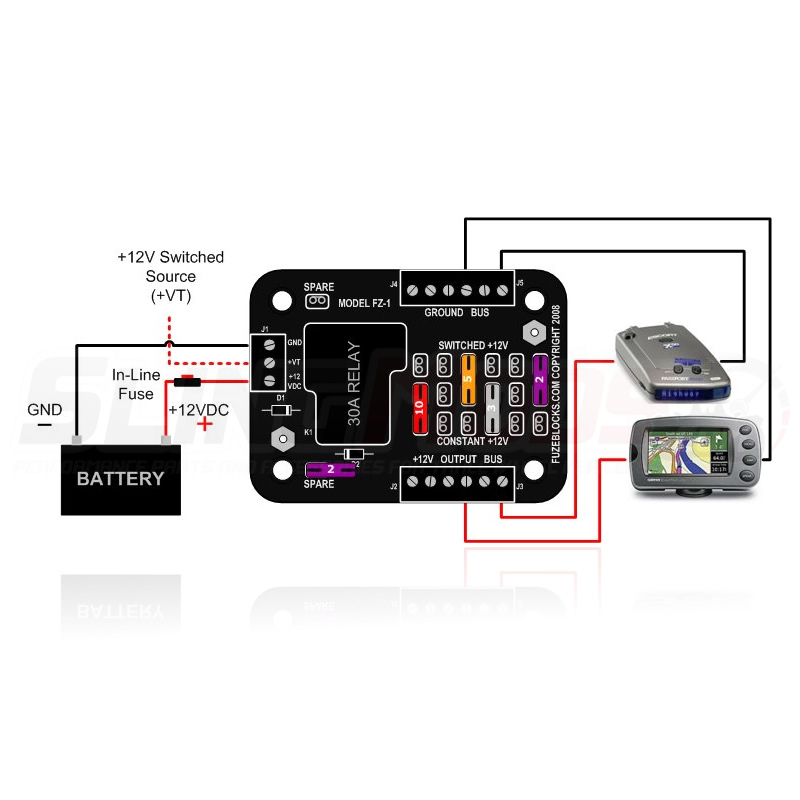
What I was not understanding was how an accessory with terminal ends gets hooked into the fuse box I bought. I had only seen pictures of the outside of the fuse box (have not opened the package yet).
Now that I did some scouting, I found a picture of the inside of the fuse box and now I see how they connect. Screws. Doh!
Thank you for going out of your way for me to help explain, greatly appreciated ![]()
Just got my brand new wheels on, and on the way home I hit the pothole from hell. It's inevitable here in Massachusetts, there is no money for road upkeep.
It was really bad. Now I have a new rattle underneath. Not there on smooth parts, but bumpy parts of the road it really makes noise.
What did I do............. ![]()
I have one that will be installed. Guess I just don't understand how accessories that use two hooked battery terminal connections can be hooked up to a fuse block. Lot to learn I guess.
