


What was today's Sling project-Mods , goodies....?
-
-
Fairly easy. You can just loosen the front of the deck to work the wires through. They aren’t falling down since there is plenty of frame in the way.
thanks for the info sir.
-
I drilled a hole in the outer front corner (around !/2" or so to allow clearance for the connectors I used, IIRC) in the recess the roll hoop speaker enclosures mount in and routed the speaker wires along the inside of the cockpit and up the rear panel before placing the wires behind the front edge of the rear deck cover. It's really not very difficult. I don't remember if I also removed some of the rear deck screws for easy access under the cover at the front near where the roll hoop speaker enclosures mount. IIRC, I just fished a piece of stiff wire thru the hole I drilled, feeding it so it came out near an edge of the rear deck cover and then used it to pull the speaker wires thru the hole and into the mounting recess.
-
Gotta luv pkgs from DDM. Installation on Sunday.
Sent from my SM-G960U using Polaris Slingshot Forum mobile app
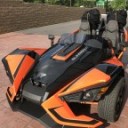
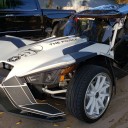
So here it is. DDM Fender Vents. Easy to do, but do-it-yourself-vasectomy scary.
Can't go back now. I did it a little different than DDM's instructions. I instead drilled a 1/2" hole in the corners, then used a vibratory saw to cut along the inner brace (Their instructions say use a 1/4" Drill as a cutter all along the edge). Cut it rough then fine tuned and sanded the cut.
Then instead of using the provided stainless steel screws, I used black painted self-tapping truss head screws. Makes a cleaner, flusher look in my opinion.
And the final job:
Now, com'on Dave@DDMWorks and Angie@DDMWorks - let's get the Black Friday sale going!
-
Display More
So here it is. DDM Fender Vents. Easy to do, but do-it-yourself-vasectomy scary.
Can't go back now. I did it a little different than DDM's instructions. I instead drilled a 1/2" hole in the corners, then used a vibratory saw to cut along the inner brace (Their instructions say use a 1/4" Drill as a cutter all along the edge). Cut it rough then fine tuned and sanded the cut.
Then instead of using the provided stainless steel screws, I used black painted self-tapping truss head screws. Makes a cleaner, flusher look in my opinion.
And the final job:
Now, com'on Dave@DDMWorks and Angie@DDMWorks - let's get the Black Friday sale going!
Very soon!!

-
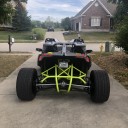
first day of vacation! Pretty productive, replaced the LEDs above and below my outside lights with high-quality ones, still need to do the ones on the splitter. Added a white LED strip over the grill and two red ones running down the inside of the front wings to give the front a little more pop! Once I got back from the bar, I mean lunch.... I added some red interior led lighting along the center consul and under the dash, already had some LEDs in the cupholders. The interior lighting is hooked to the Viper alarm so whenever the ignition is shut off or the alarm is disarmed the interior lighting comes on for 30 seconds, also installed a switch on the dash to turn them on whenever I want. If that wasn’t enough, I Started replacing the old worn out torx bolts with shiny stainless steel bolts with red aluminum washers.
-

Very soon!!
Display MoreSo here it is. DDM Fender Vents. Easy to do, but do-it-yourself-vasectomy scary.
Can't go back now. I did it a little different than DDM's instructions. I instead drilled a 1/2" hole in the corners, then used a vibratory saw to cut along the inner brace (Their instructions say use a 1/4" Drill as a cutter all along the edge). Cut it rough then fine tuned and sanded the cut.
Then instead of using the provided stainless steel screws, I used black painted self-tapping truss head screws. Makes a cleaner, flusher look in my opinion.
And the final job:
Now, com'on Dave@DDMWorks and Angie@DDMWorks - let's get the Black Friday sale going!
-
chavey2 It's here! https://www.ddmworks.com/
-
chavey2 It's here! https://www.ddmworks.com/
Hey Angie ask Dave@DDMWorks if he sees any DASHING thru the snow in my future?
Sorry I just had to try.
You guys have a fantastic Thanksgiving!
-
chavey2 It's here! https://www.ddmworks.com/
Yes it is!!
I wish me a Merry Christmas,
I wish me a Merry Christmas,
I wish me a Merry Christmas,
And a Happy New Year!
-
Yes it is!!
Yay! You will love it!!

-

Guess I should have waited for the free shipping
Sent you a message
-

Sent you a message
just kidding. APPRECIATION what you guys have done. One thing I like though to know is can i send the ECU to obd before getting the kit
-
Ended up getting the DDM works 3 way shocks (black metallic springs), swaybar, end links, and mount. Hopefully they come with the updated rear spacers for the rear shock mount.
-

Ended up getting the DDM works 3 way shocks (black metallic springs), swaybar, end links, and mount. Hopefully they come with the updated rear spacers for the rear shock mount.
Thank you for your order! Your shocks will come with the spacers for install.
-
just kidding. APPRECIATION what you guys have done. One thing I like though to know is can i send the ECU to obd before getting the kit
Hello, You can send the ECM to Mefiburn before the kit arrives, send a message to Angie and she can help get you the form that you send with the ECM.
Dave
-
Ooooo heck. Thank you DDM!
-

Ooooo heck. Thank you DDM!
Thank you for your order!
-
OK, I got a 3-D printer been messing with it, working on making an axle nut cover, tired of my nuts hanging out! Proto type came out excellent first try, just need to refine it a bit.
-
