DIY Rooftop Carrier For Aftermarket Twist / BulletSpeed Canvas Top

  • DIY COST: $223.00 Total Material
    Time Spent: 2 days (after securing supplies)
    Difficulty Level: Not for "Tim 'The Tool Man' Taylor"


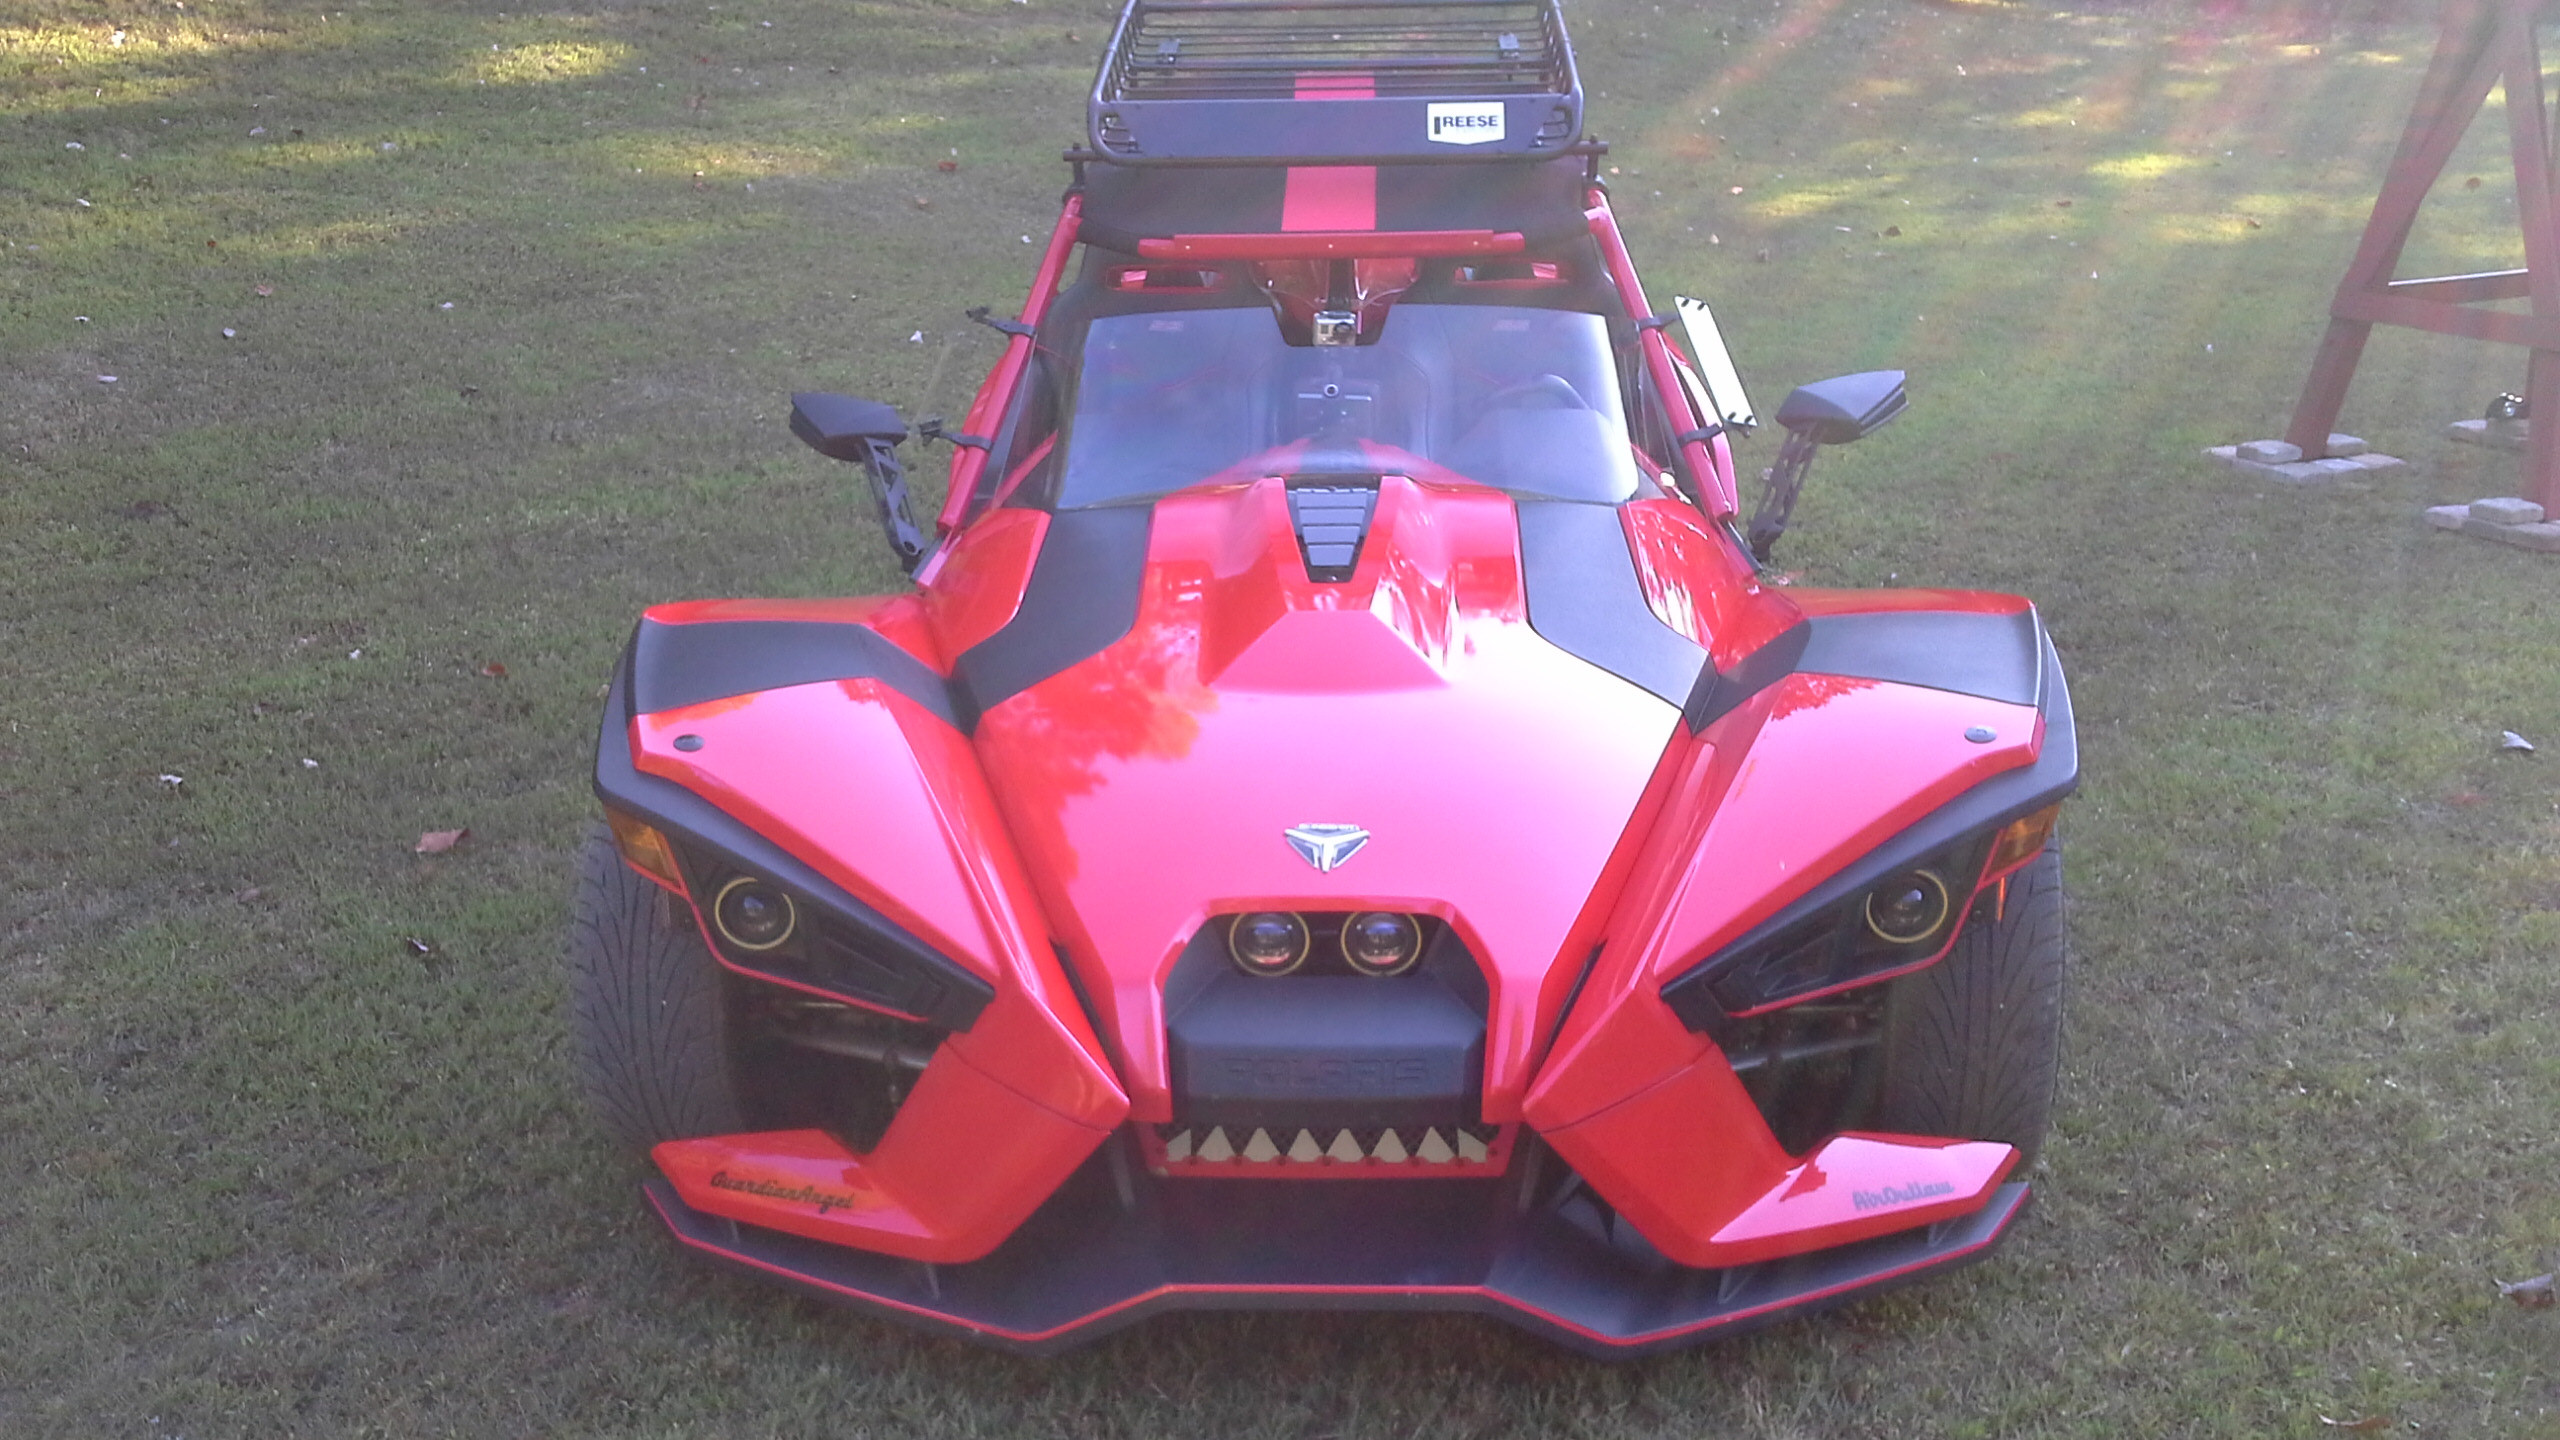
    One common problem those of us without Slingshot trailers have when planning a road trip... Where/ How will I be able to pack ALL the wife's "essentials", roadside emergency kit, tools, and couple of pair of socks for myself? I honestly figured someone would eventually design a solution for my current set- up. I like my top. I really really like it. Short of the Corbin Saddlebag modification; the current aftermarket luggage racks offered do not work with these tops. I went in search of a professional fabricator business - apparently, my requests did not yield the minimum dollar sign amount for any local fabrication shops here. Many of you have offered up some ingenious ideas and suggestions, to which I also offer a DIY solution to this problem.


    Please Note: This is what I did to my Twist Canvas Top. If you elect to follow this DIY; you accept full responsibility in doing so. :thumbsup: In other words... NOT RESPONSIBLE FOR YOUR TOP, BUSTED KNUCKLES, OR MISSING LIMBS!

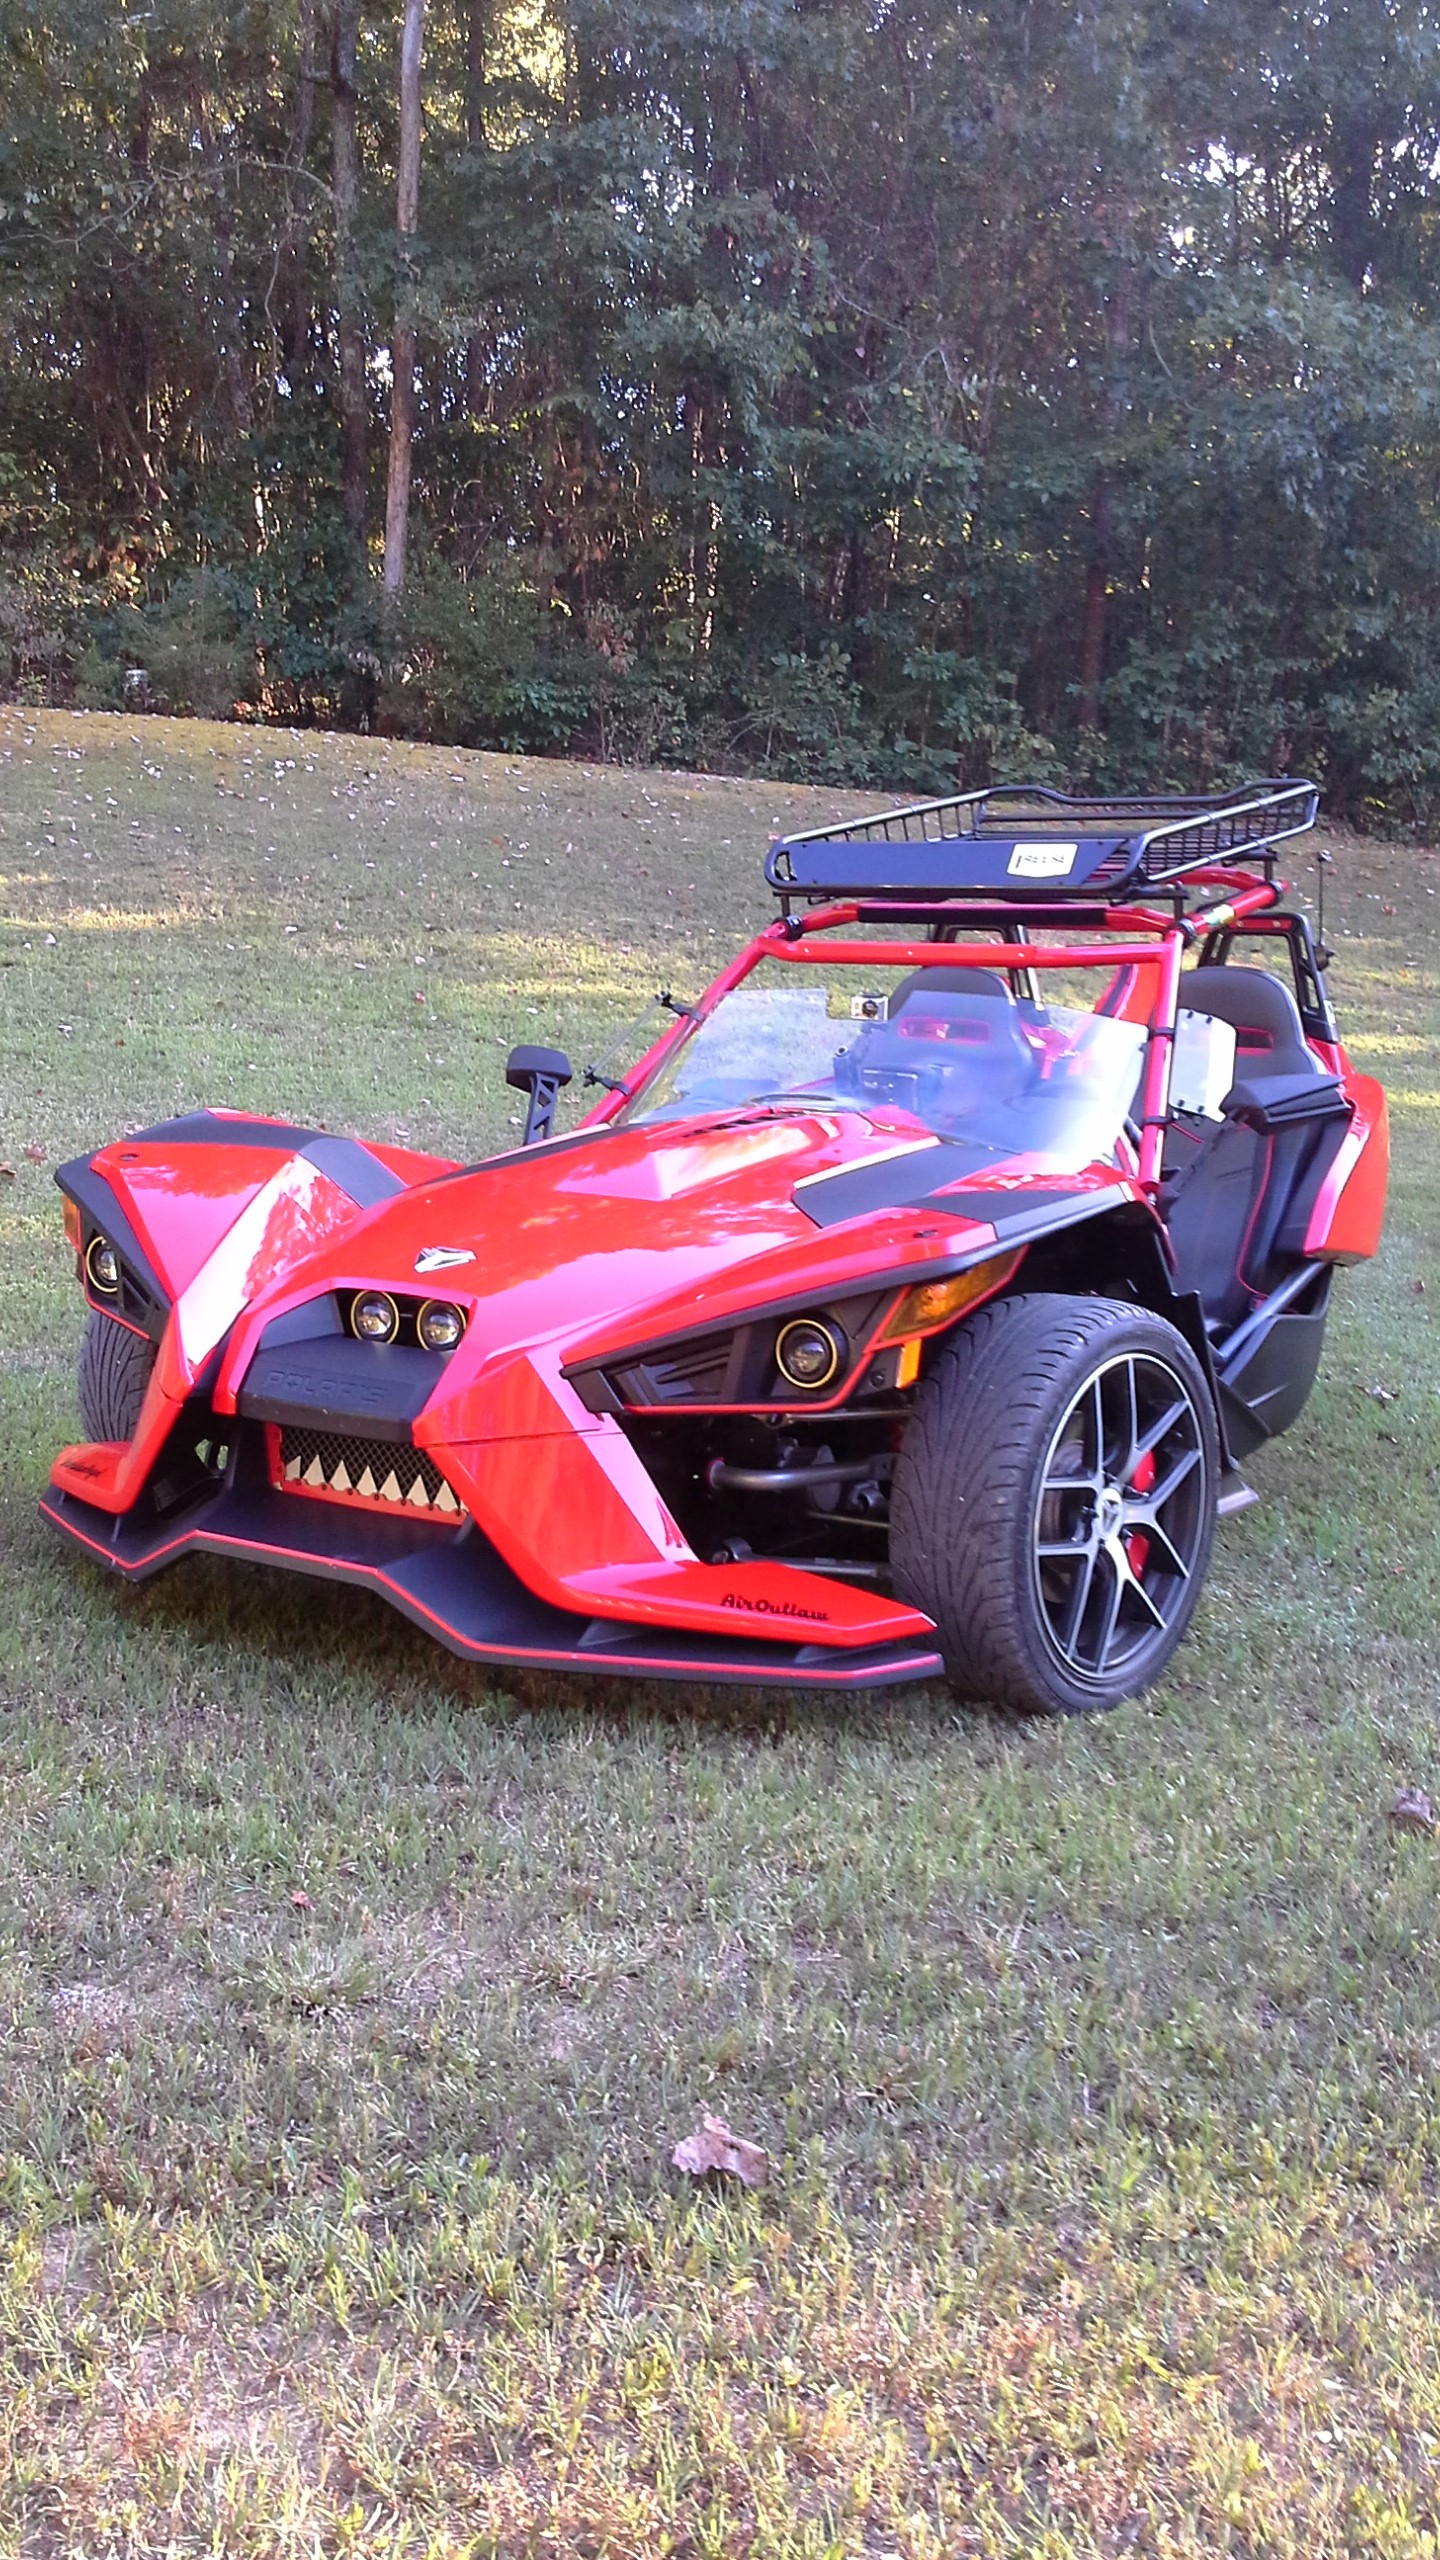
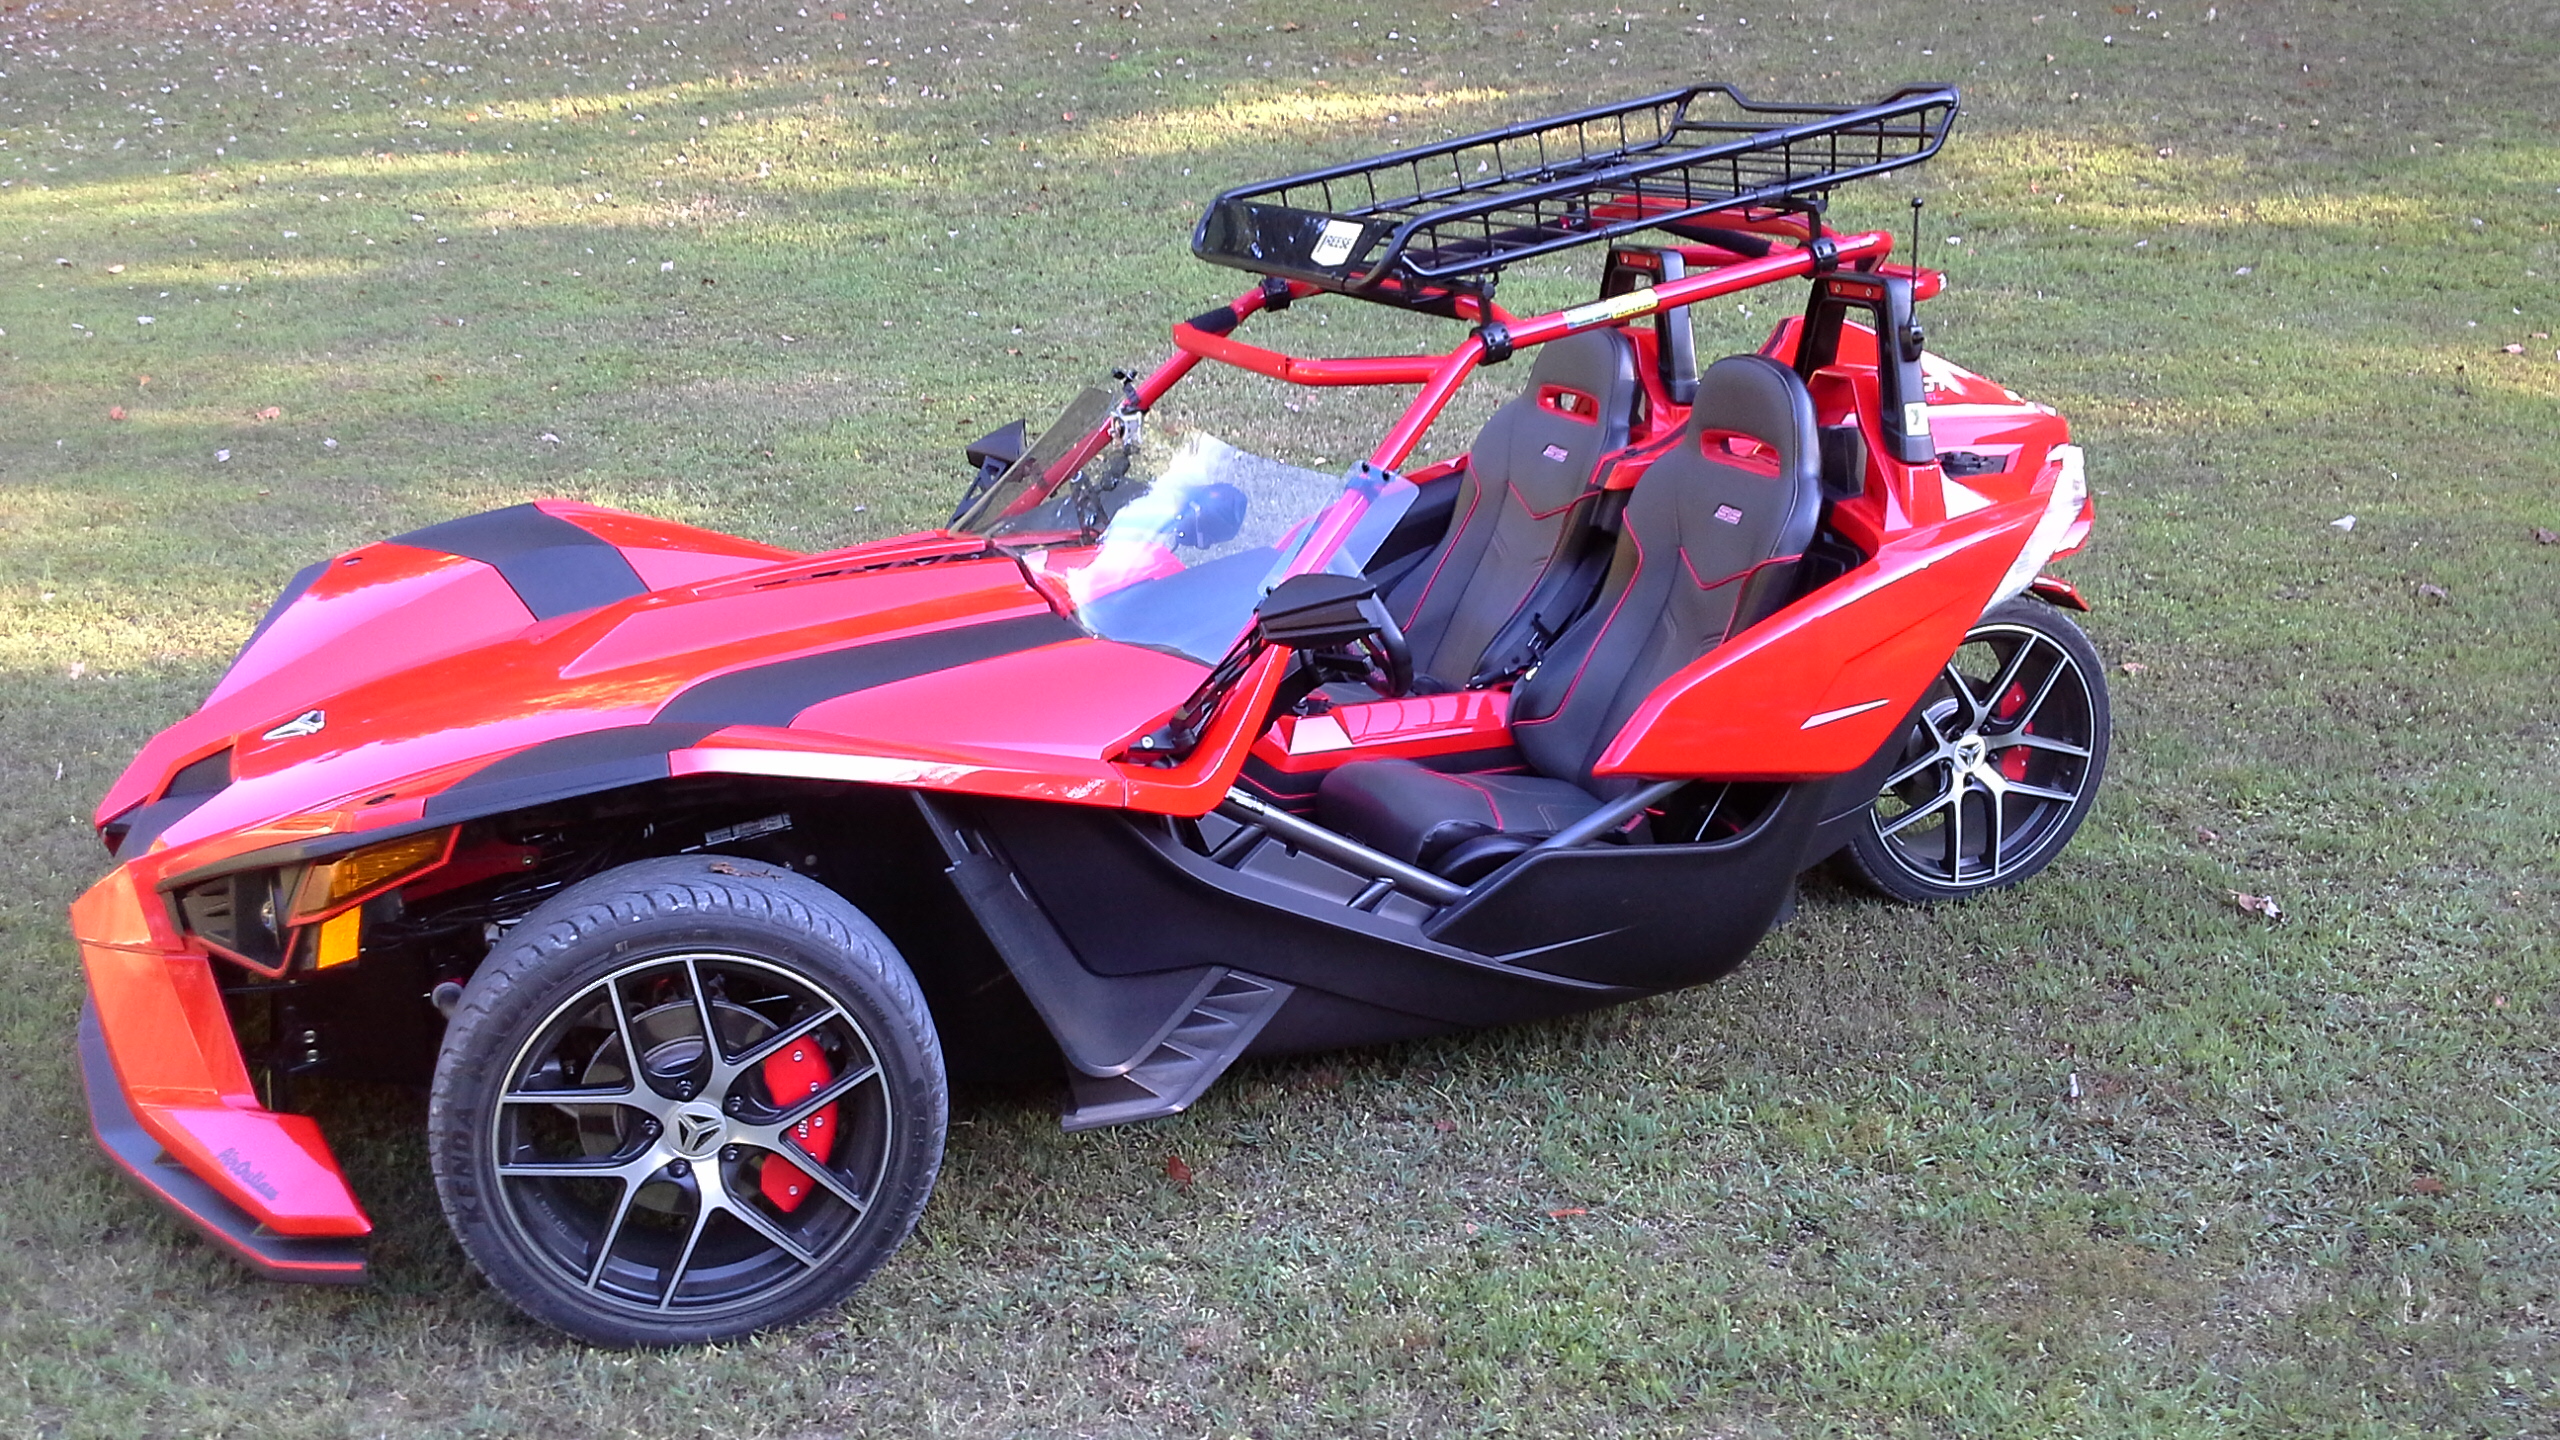
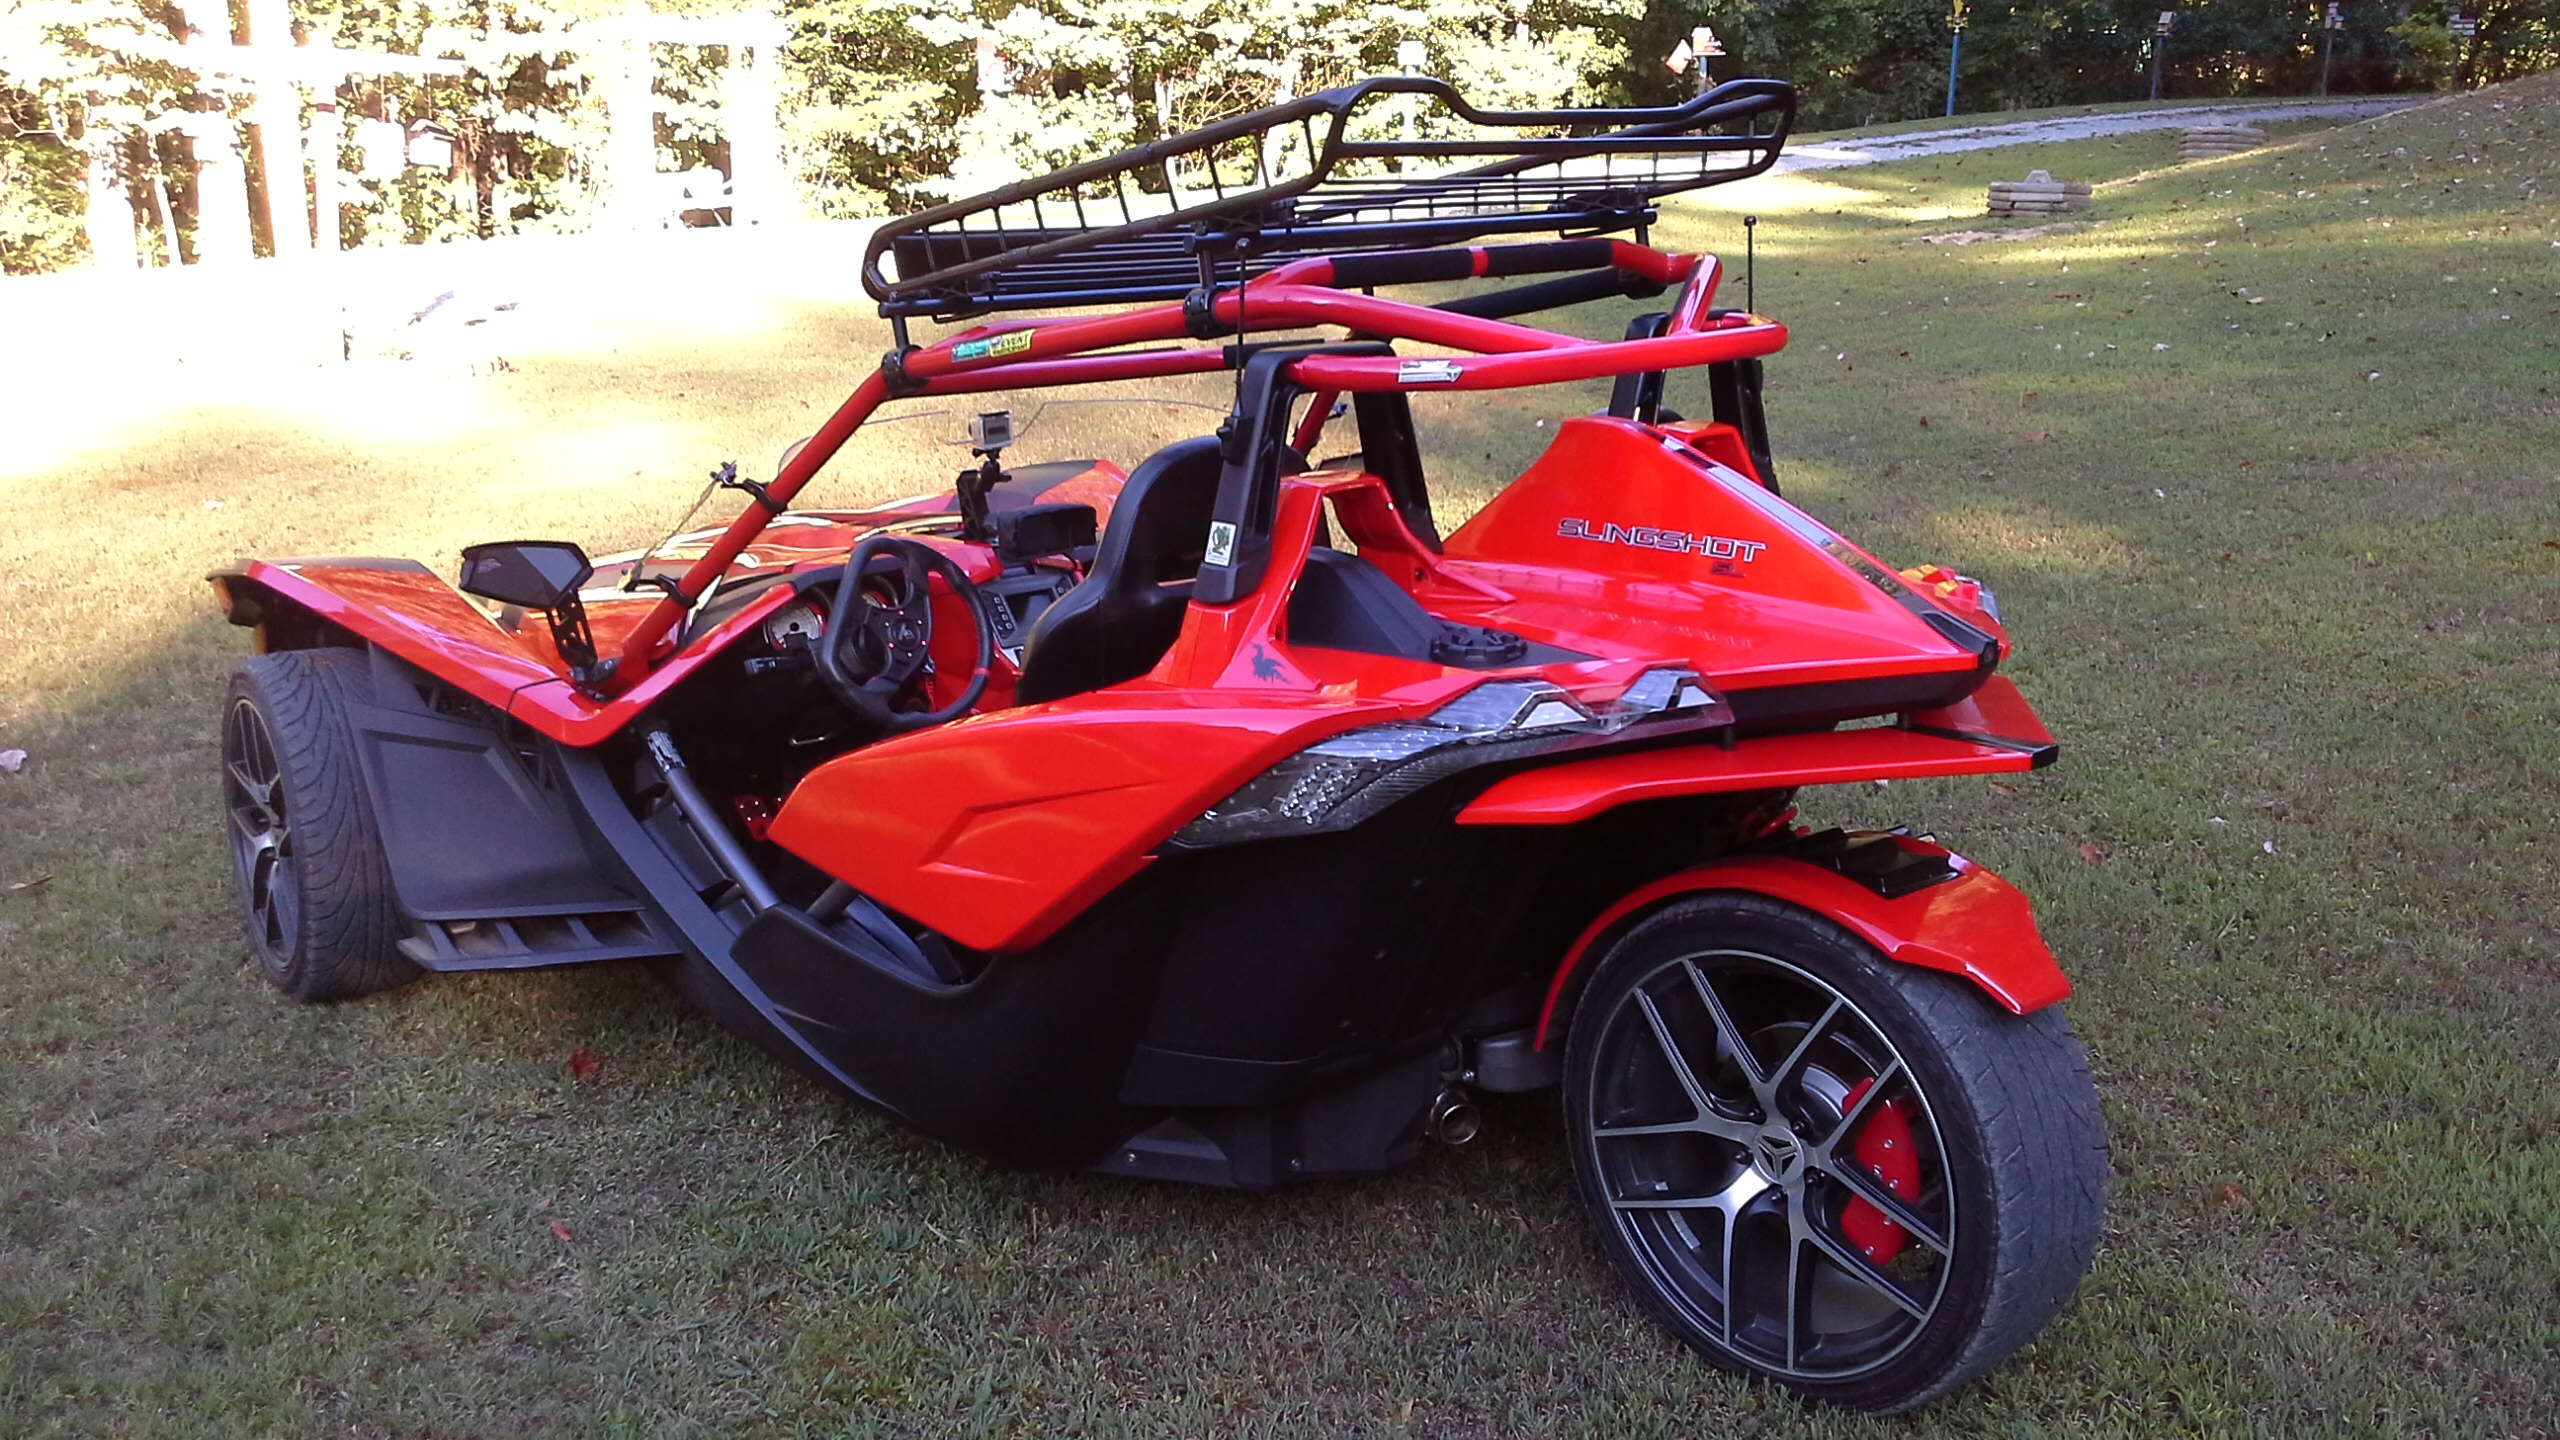
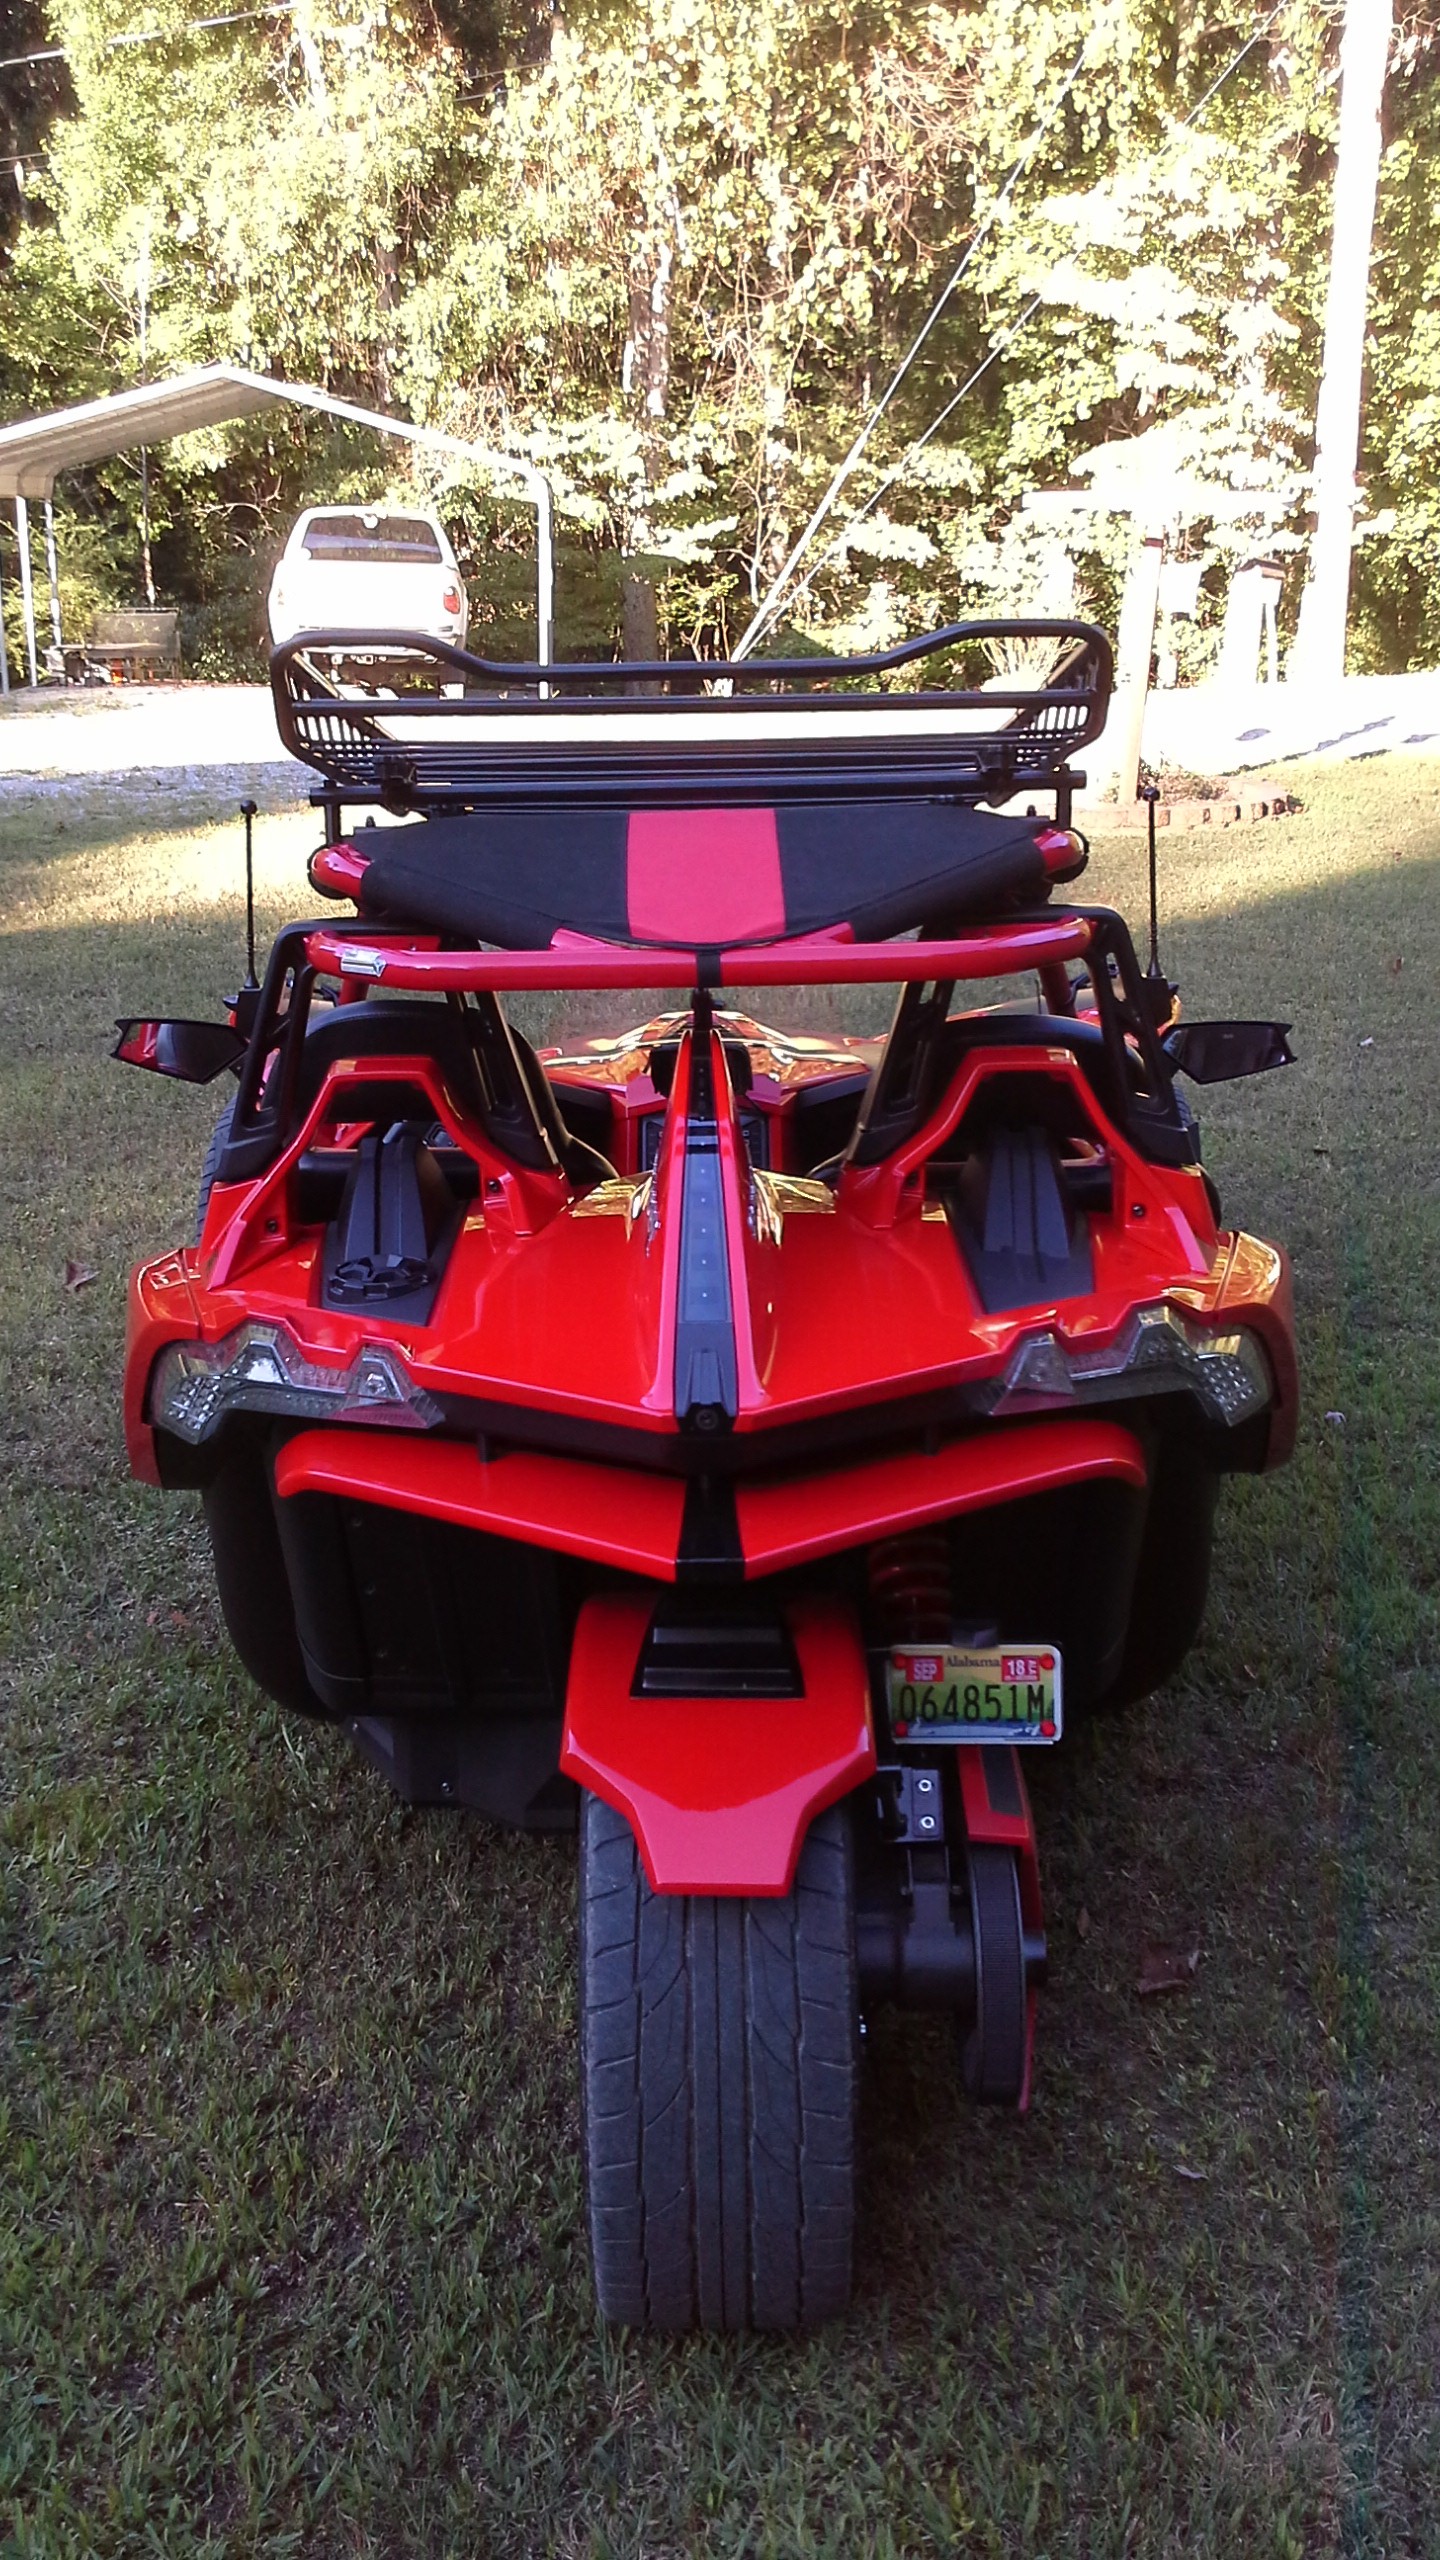
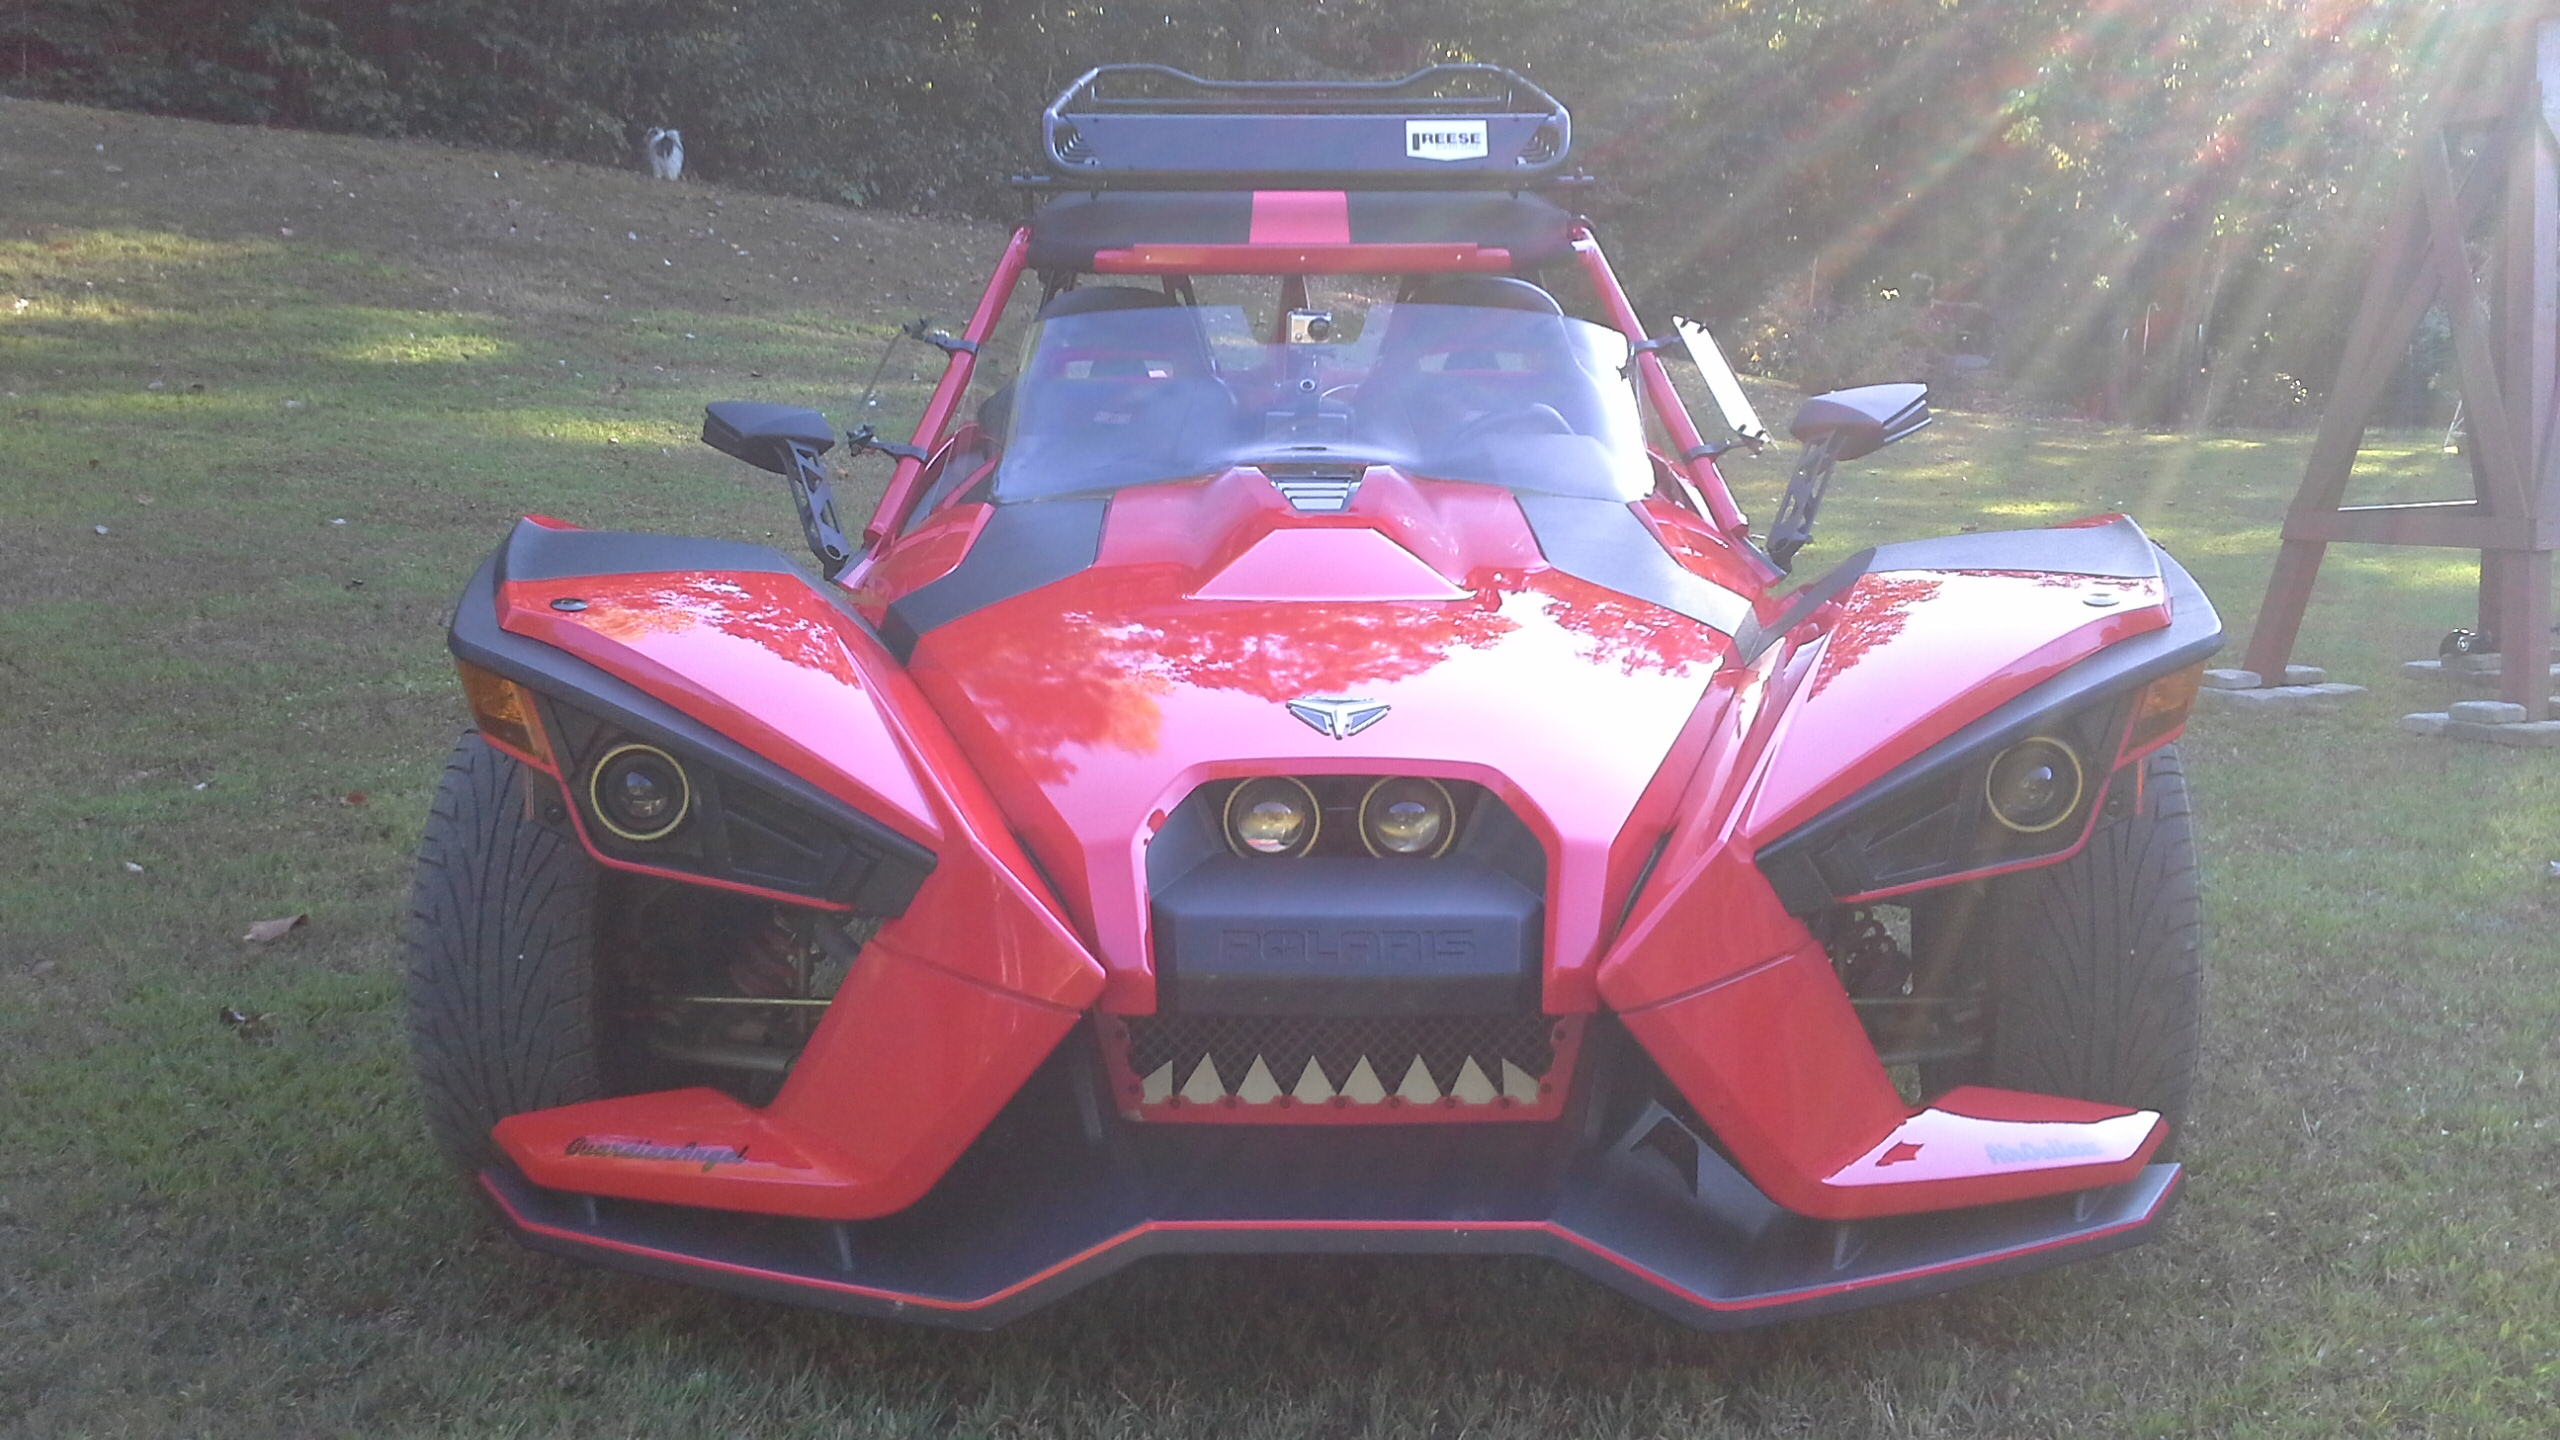
    Finished Pic Without Canvas:


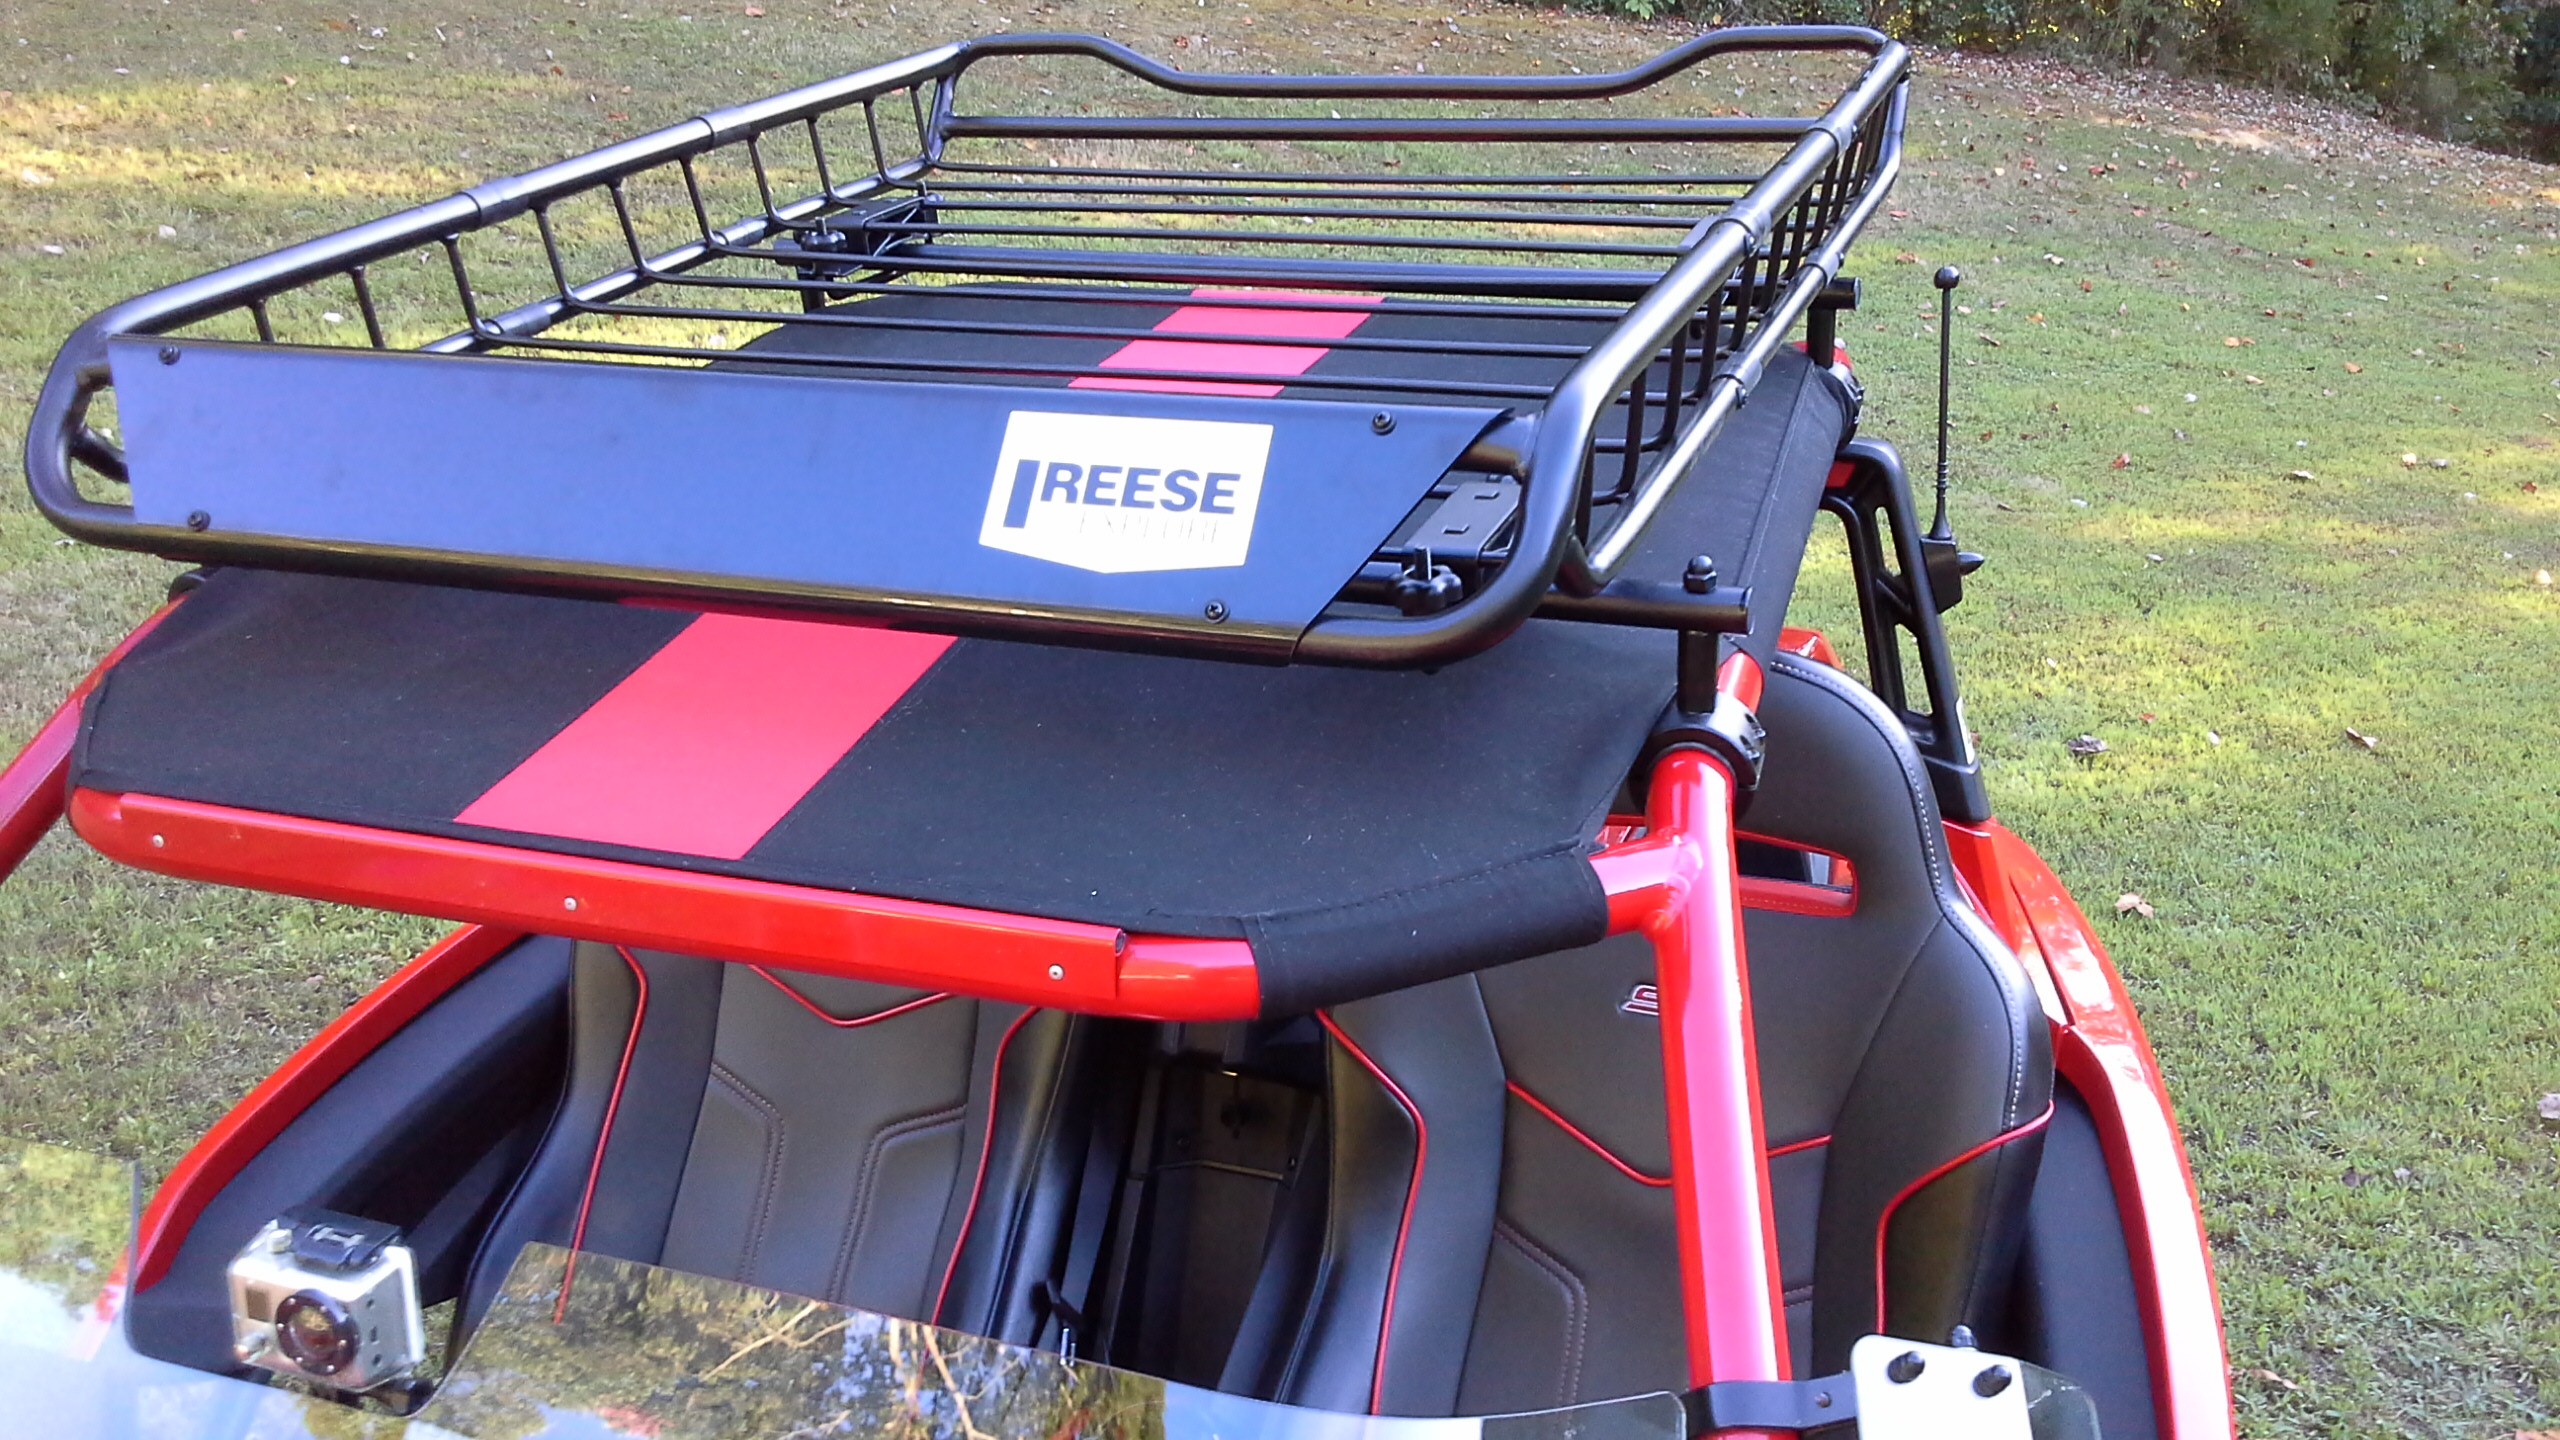
    My top is the original Gen 1 Twist Dynamics Canvas Bimini Top. The BulletSpeed Canvas Bimini Top is almost identical; with the exception of how it is mounted to rollbars. This DIY should work with the BulletSpeed however, clearance for the clamps which measure 1 3/4" W needs to be checked between the front cross bar just before the bend - turndown support.


    Parts List:
    Steel Bolt On Clamps 1.75" - 1- 3/4" Universal Roll Cage Mounts $67.50
    Reese Rooftop Cargo Basket $88.77
    Rustoleum Truck Bed Spray paint -1 can $6.50
    Galvanized Steel Conduit - 1" x 10' - 1 pc $9.90
    Wooden Dowel 7/8" x 4' - 1 pc $3.78 ( I only used 8" )
    Threaded Rod 3/8" x 16TPI x 24" - 1pc $8.99
    PVC Pipe: 3/4" x 2' - 1 pc $ 1.63 ( I only used 8" )
    Cap Nut: Zinc Plated 3/8" x 16TPI - 4 pcs $ 5.12
    Stainless Steel Nut: 3/8" x 16TPI - 14 pcs $5.88
    Loctite Blue - In Toolbox
    RTV Silicone Sealant - On Shelf In Garage
    Rubberized Material Saved from Wife's Last Clean-up $Priceless
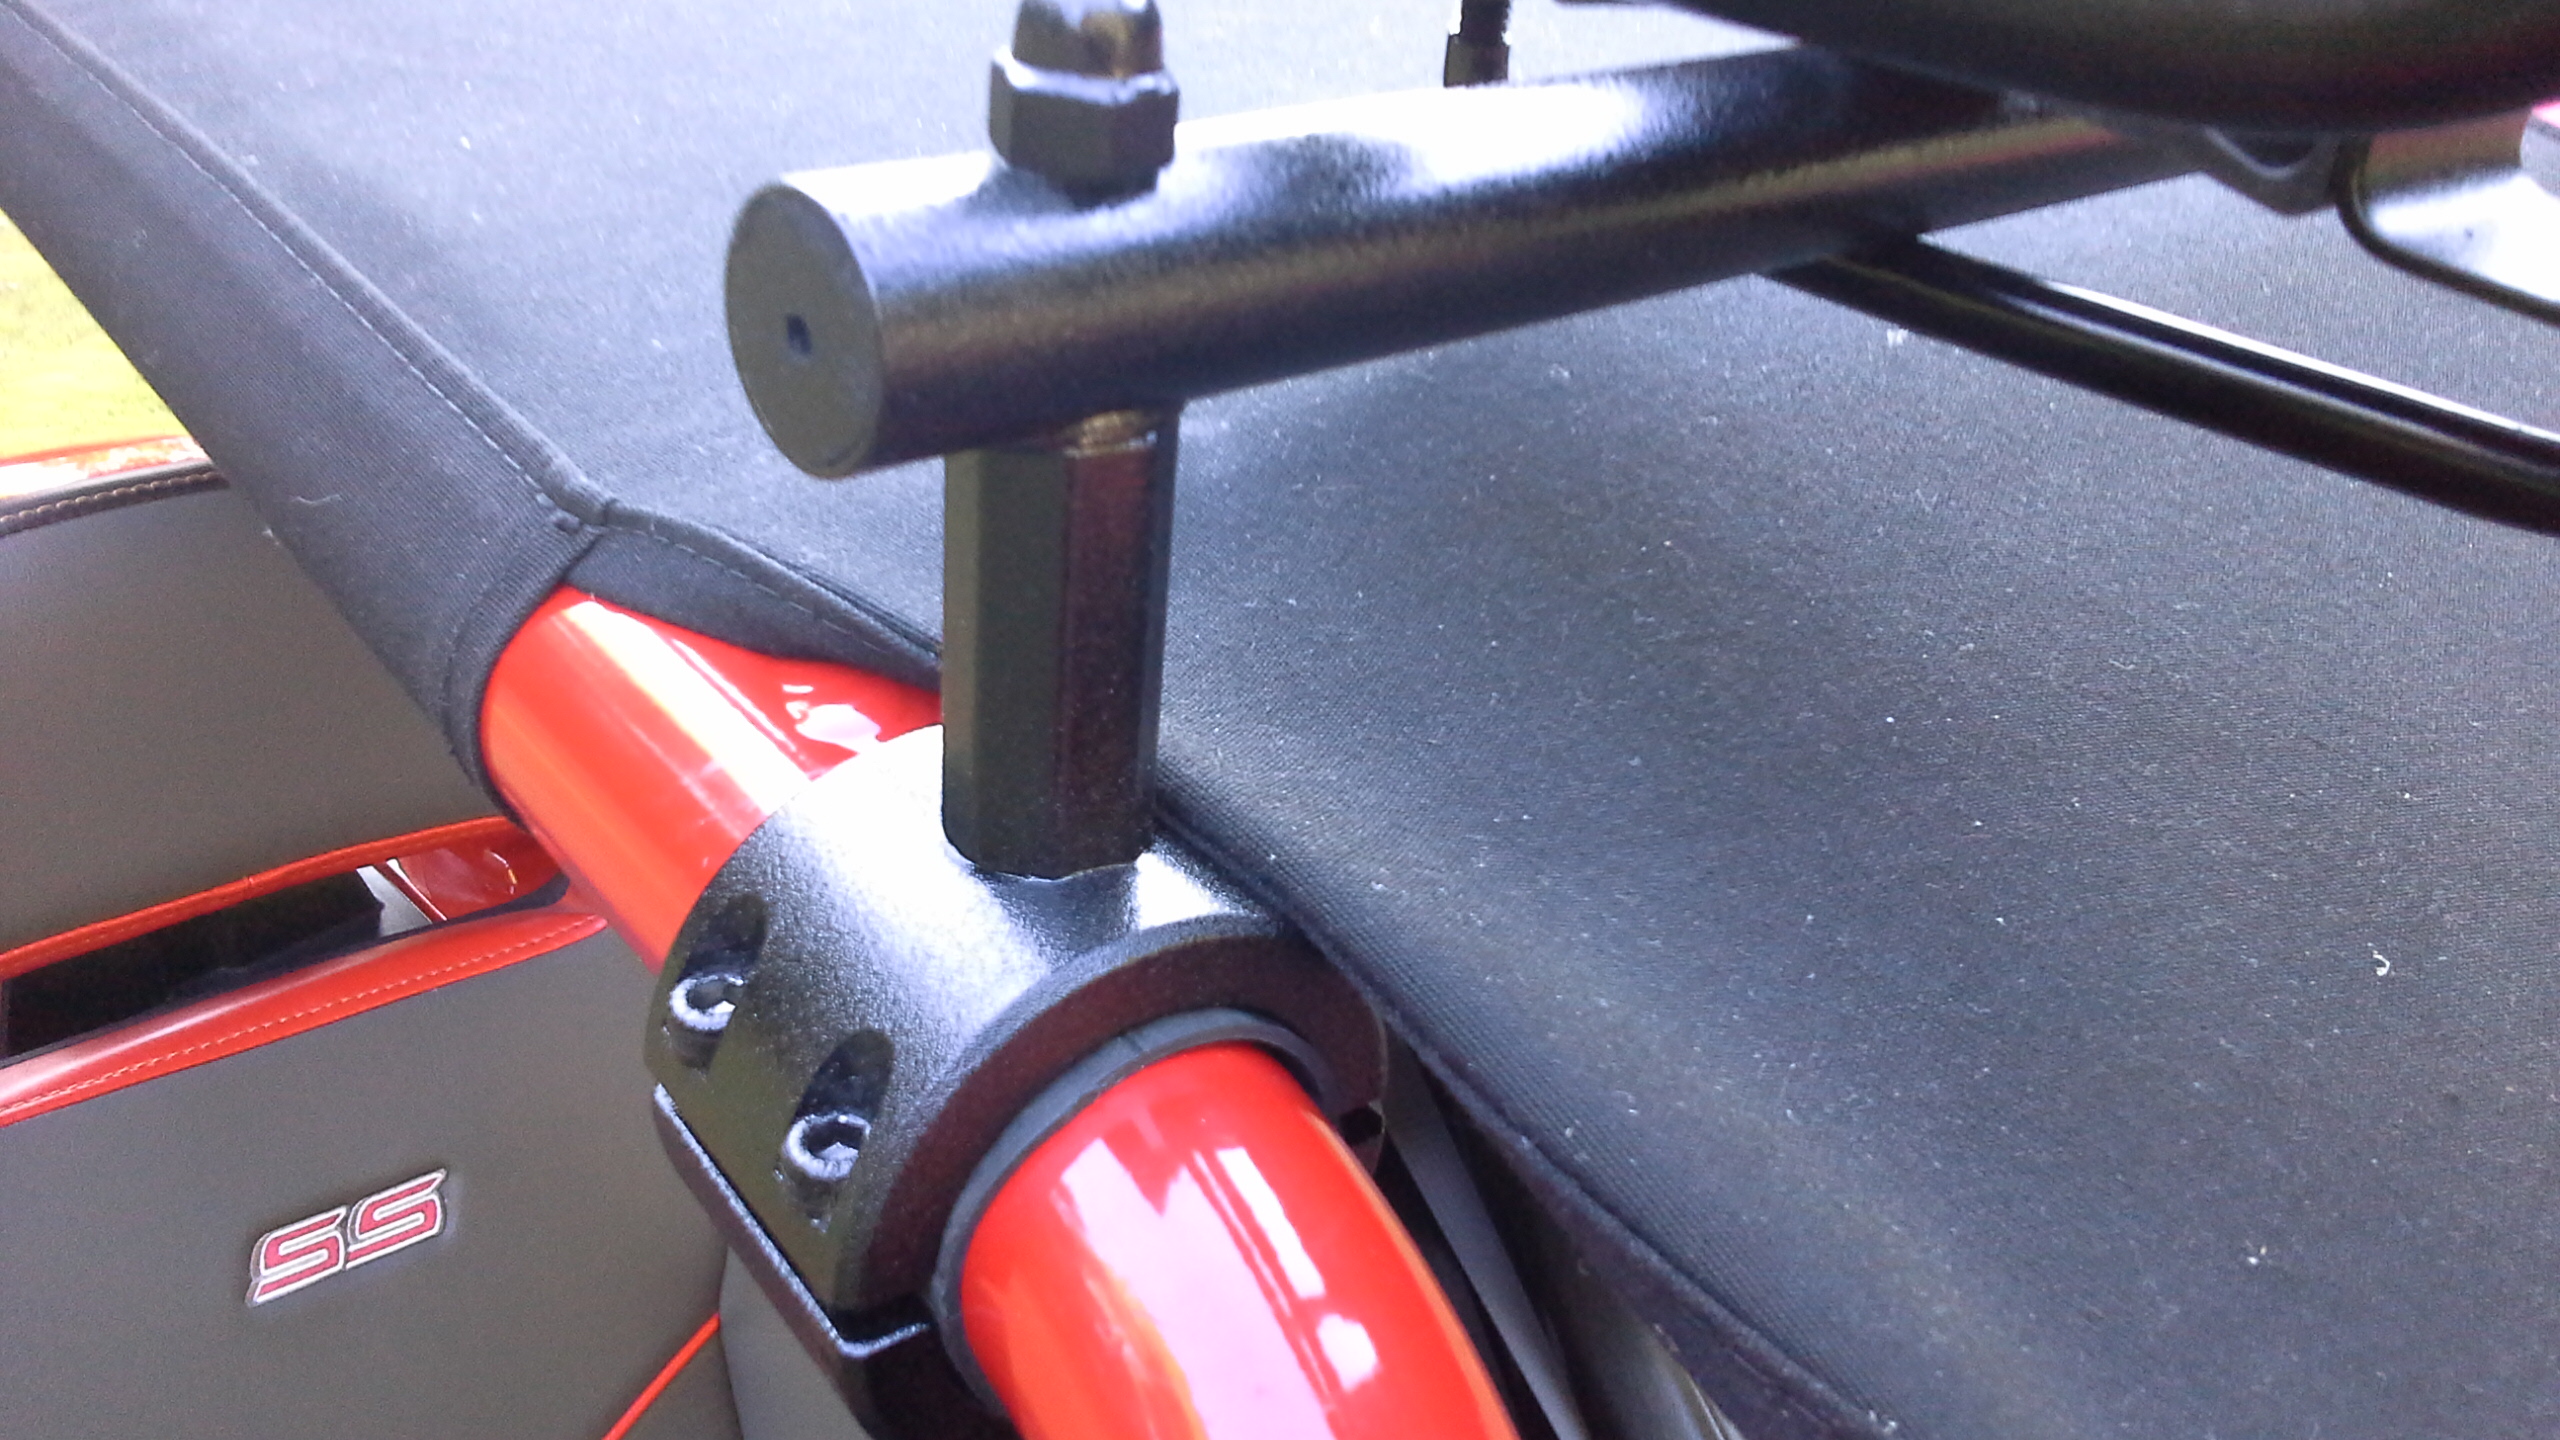
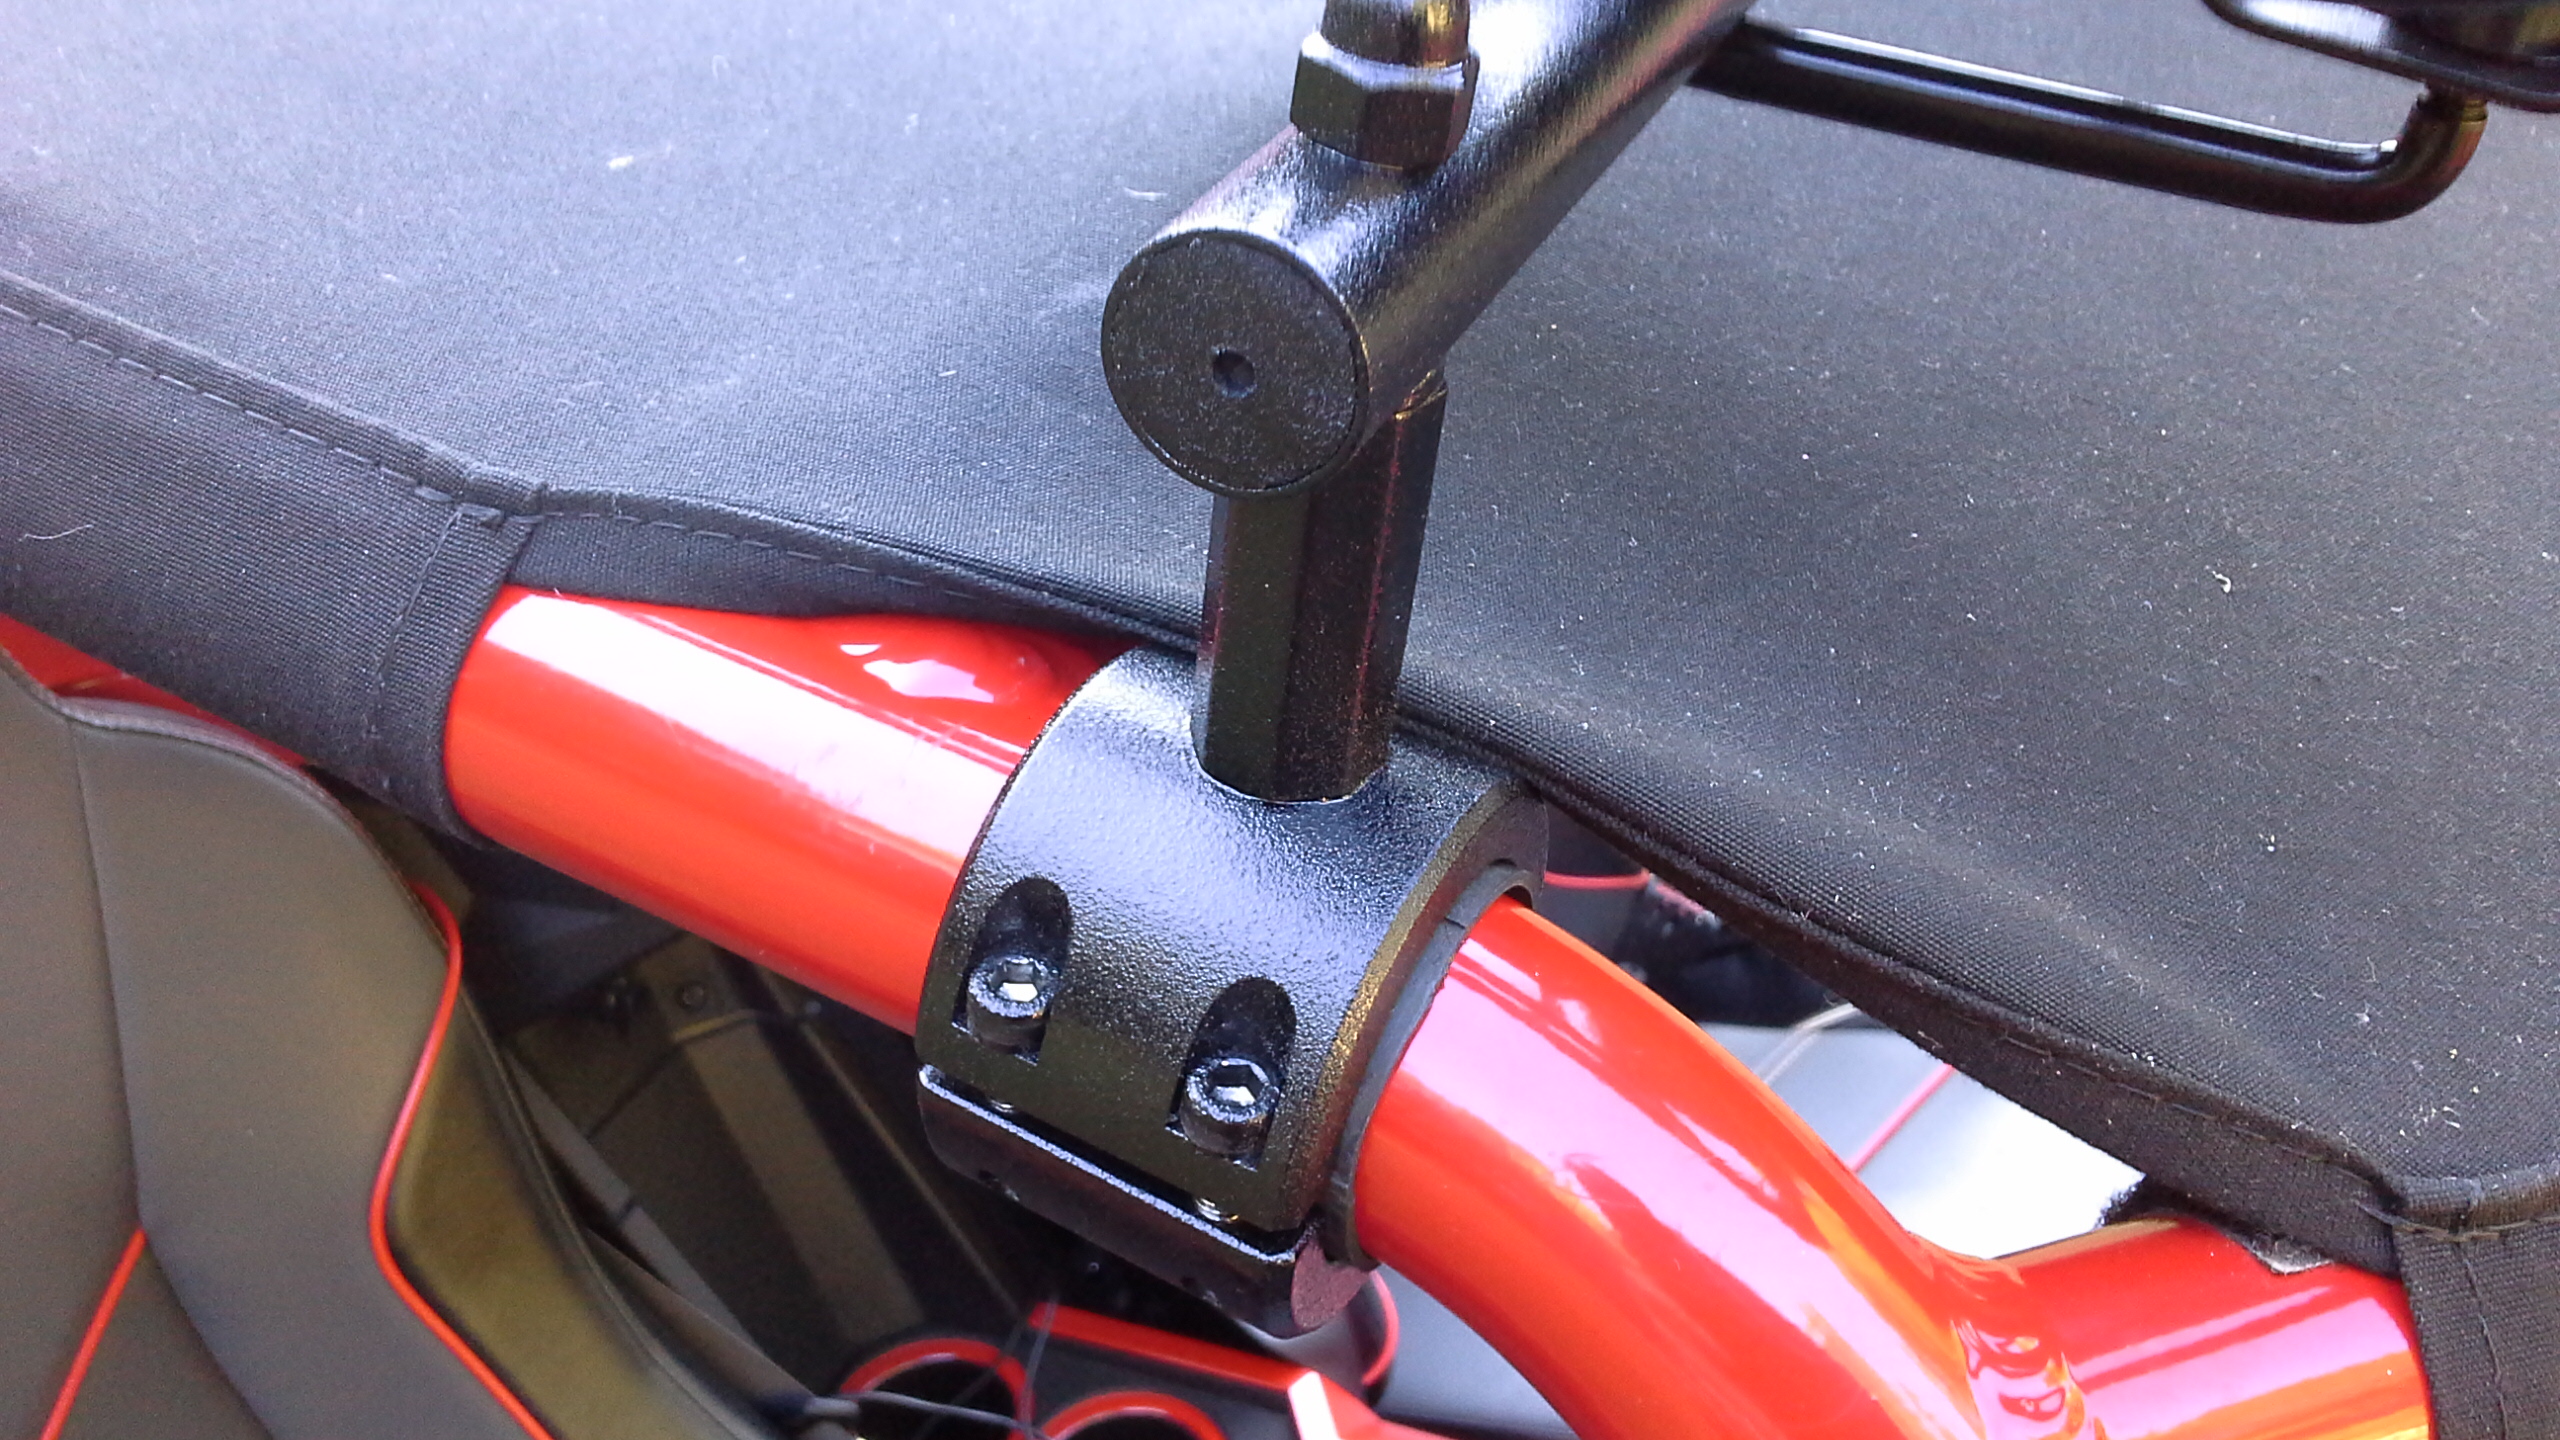
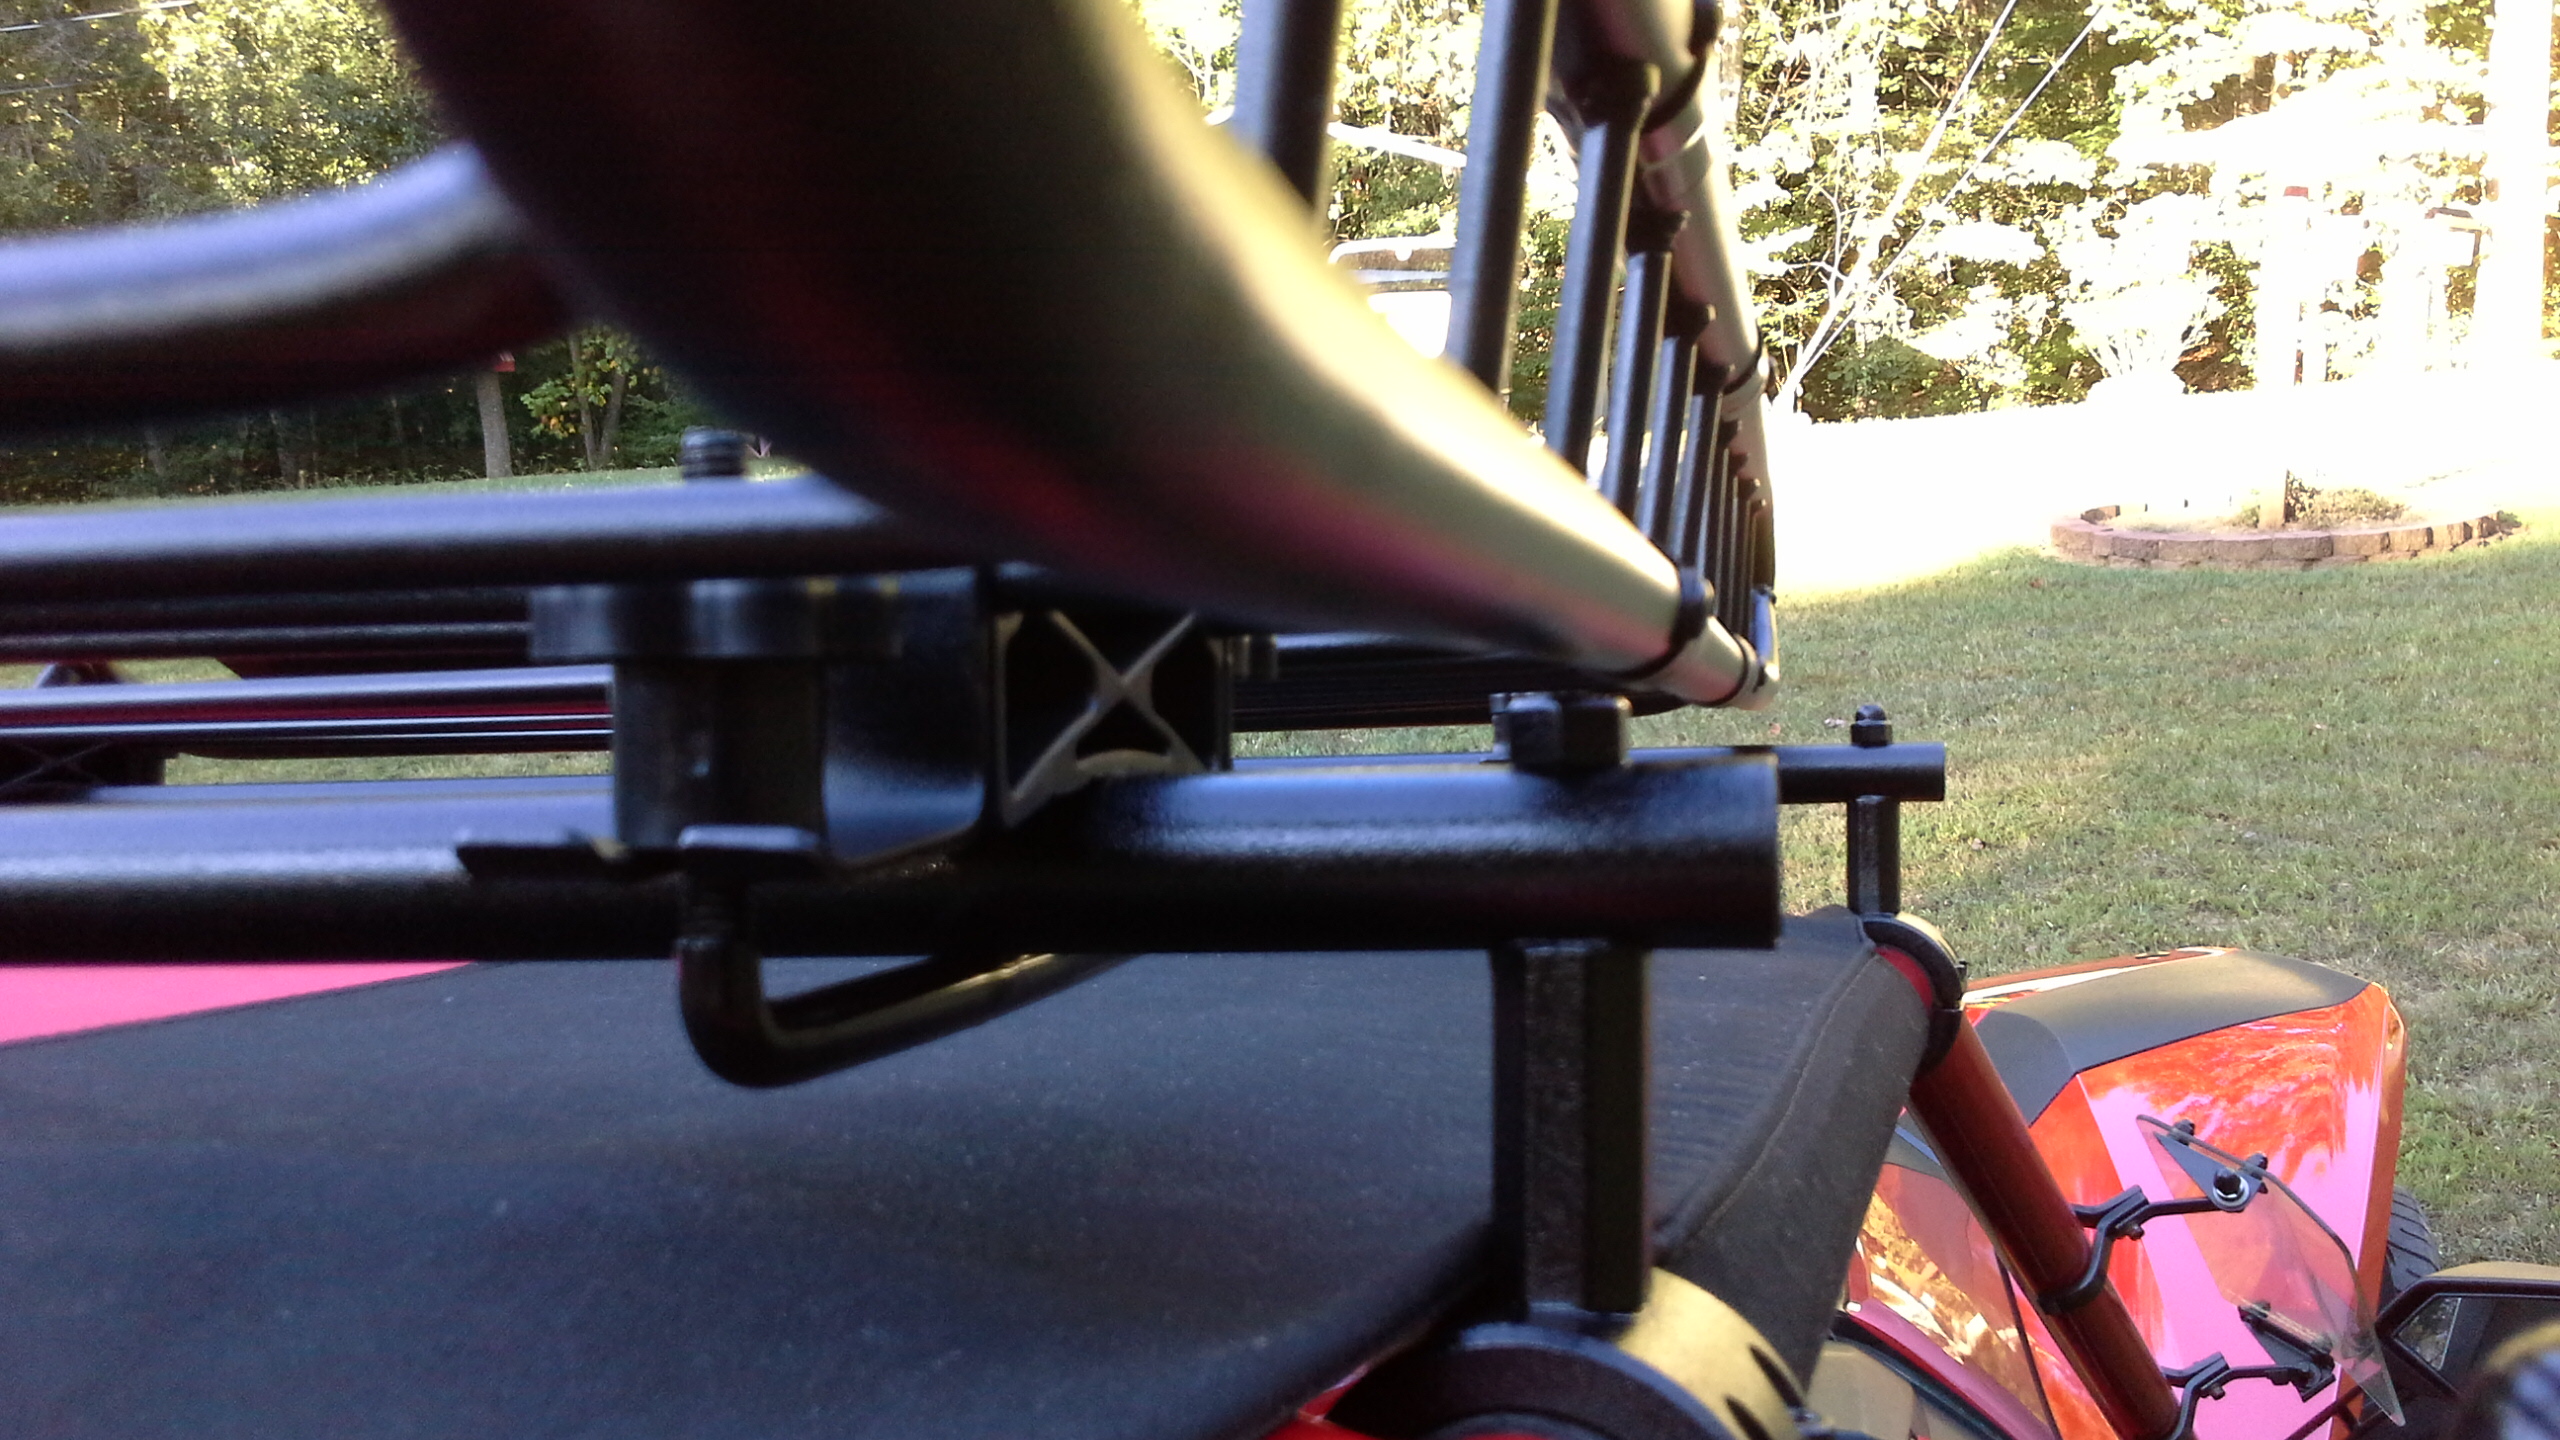


    1.) The Clamps:
    It is recommended to use a drill press for this step, as the finished holes needs to be drilled straight, however it is possible that a jig could be made for use with a hand drill.
    Clamp size is 1 3/4" W x 2.5" Outside Diameter x 1.75" Inside Diameter x 3/8" Collar


    2. Drill the Hole Centered Using A HSS (Cobalt) 5/16" Drill Bit . Thread Using A 3/8" x 16TPI Tap.


    3. Cut the Threaded Rod For Appropriate Clearance:
    With the Reese Rack I chose, I made my cuts after considering height clearance from the bottom of the Reese cartop basket to the canvas top, also the two center crossbars on the Twist top are elevated above the outside Twist top frame. I originally cut 4 pieces of threaded rod to 4" in lengths. After a mock fit-up; my final length for each piece was set at 3" lengths.
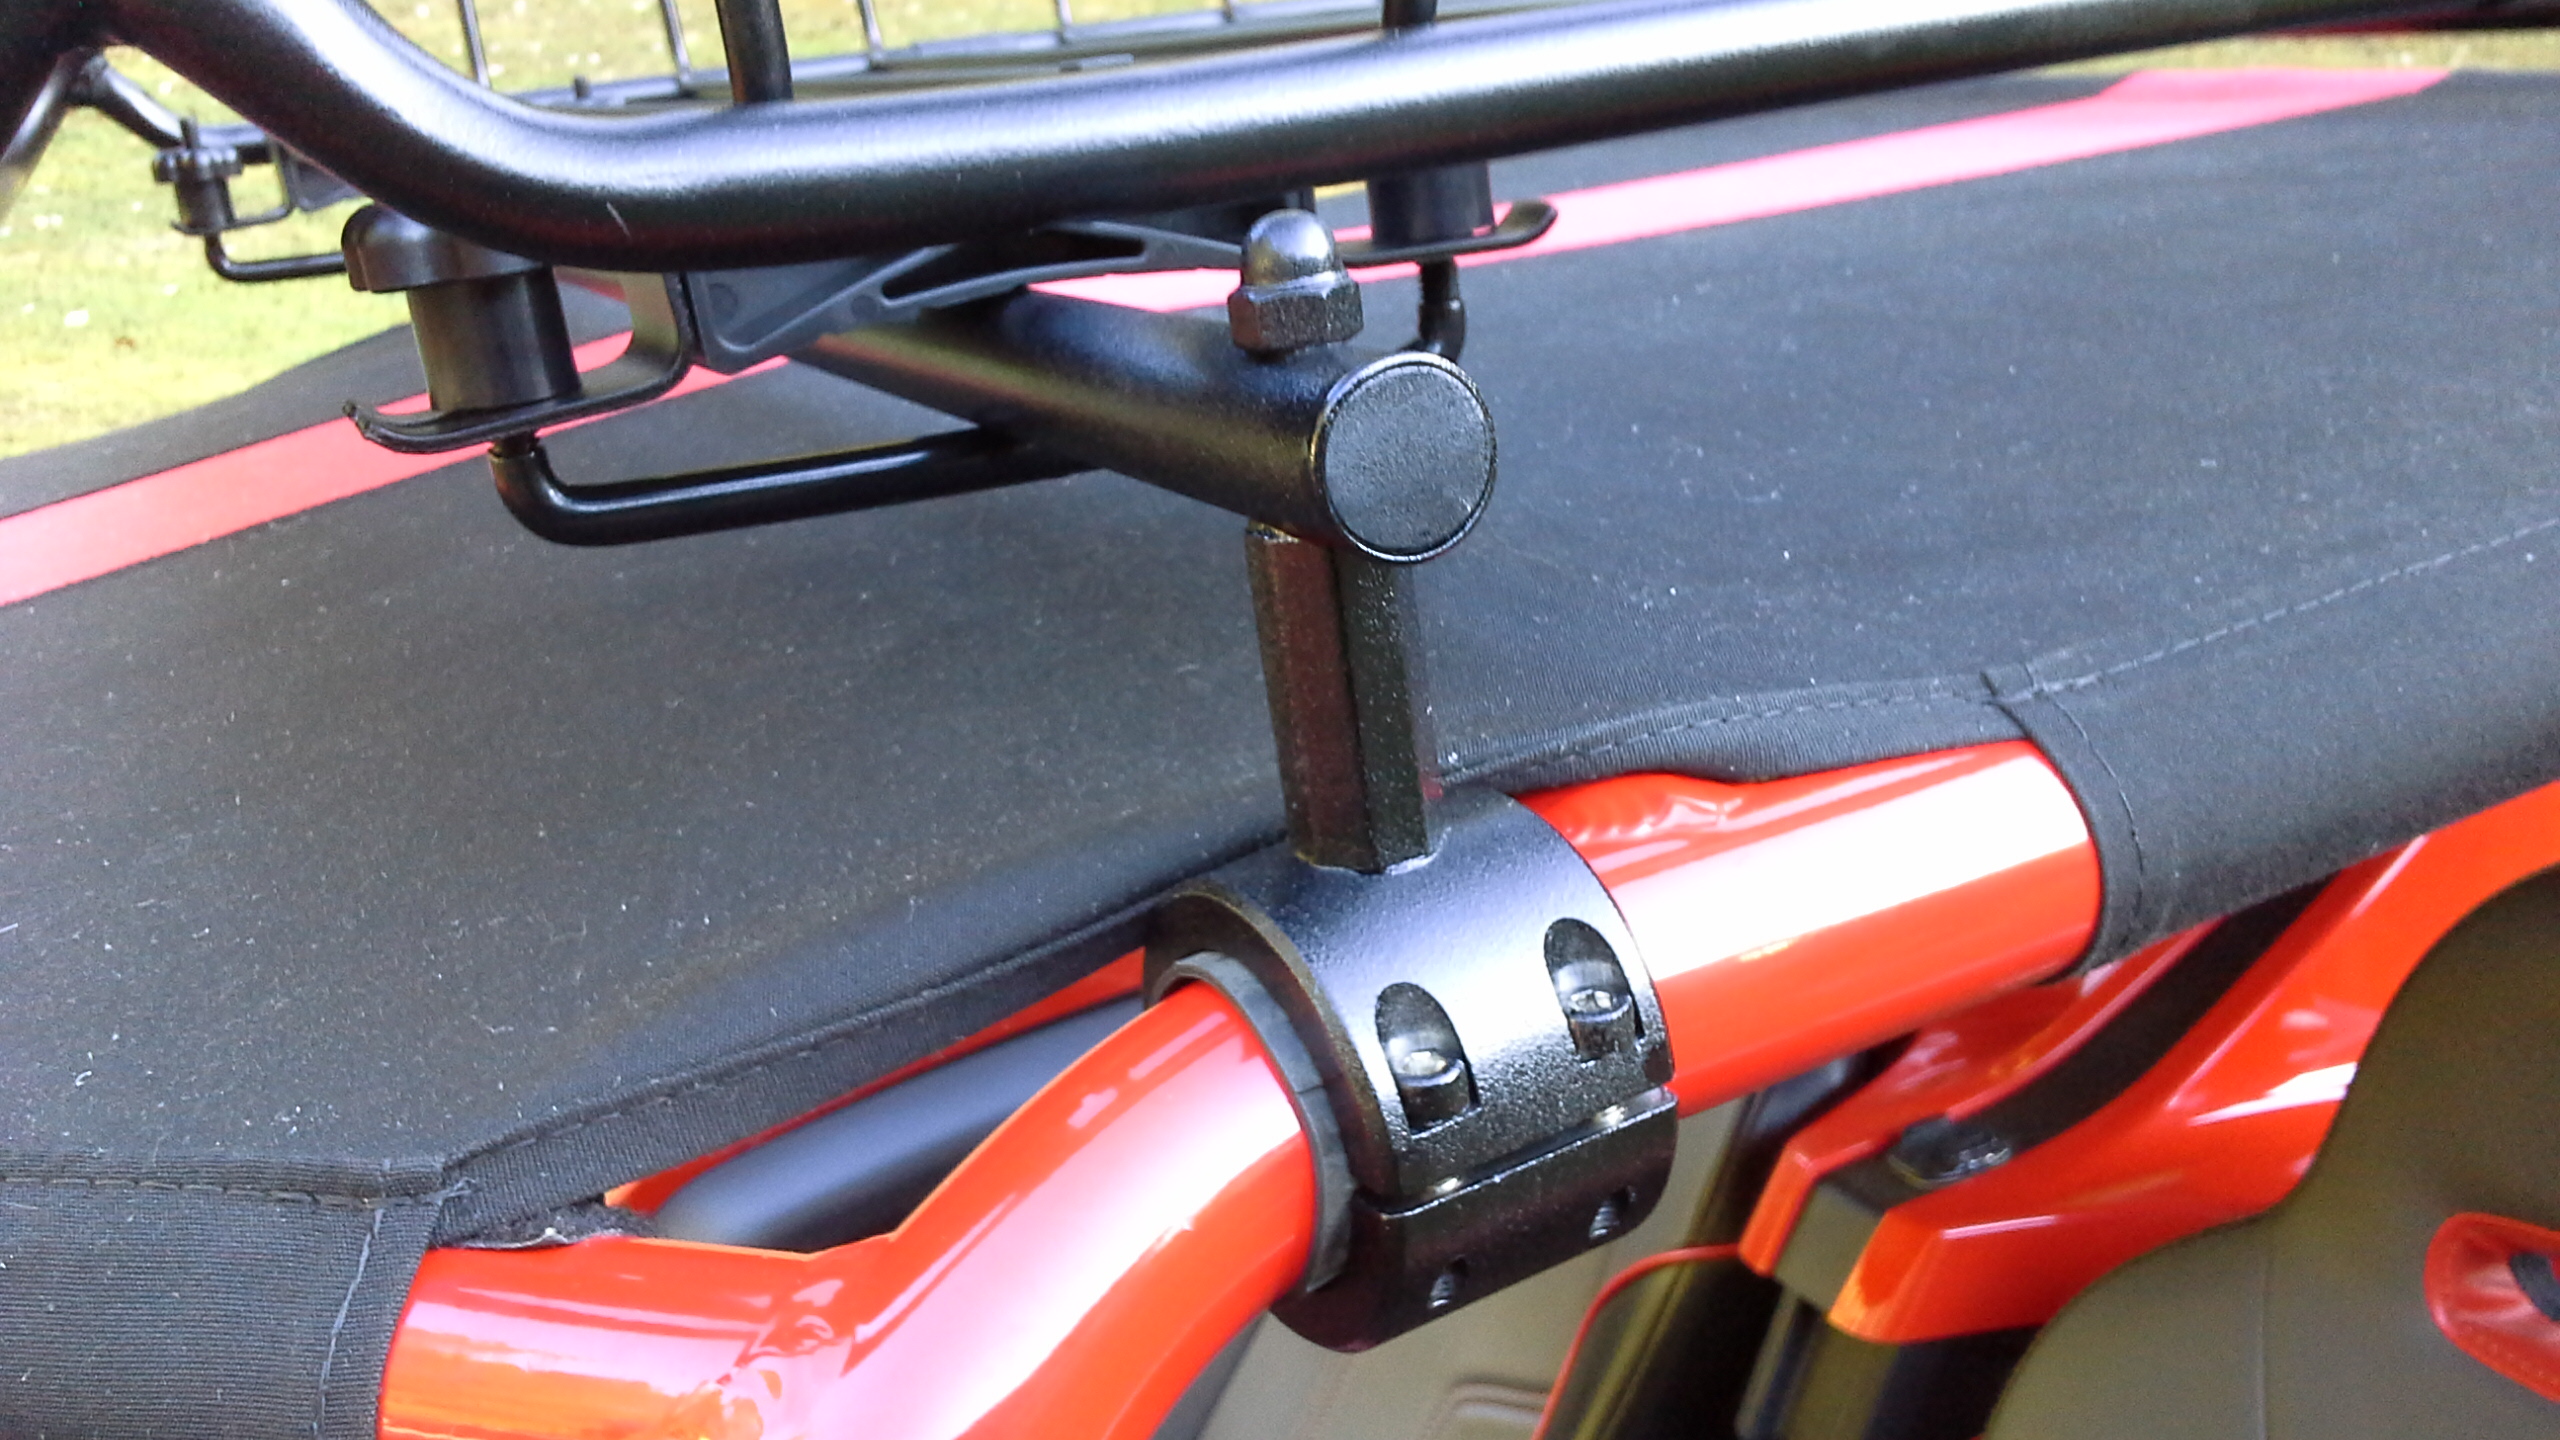
    Screw the threaded rods into each of the clamps til it is flush with the inside of the clamp surface. Thread on a 3/8" x 16TPI nut on each of the threaded rods, all the way down to the clamp and tighten. This will lock the threaded rod into place.


    4.) Mount The Clamps In Position For Mock Up:
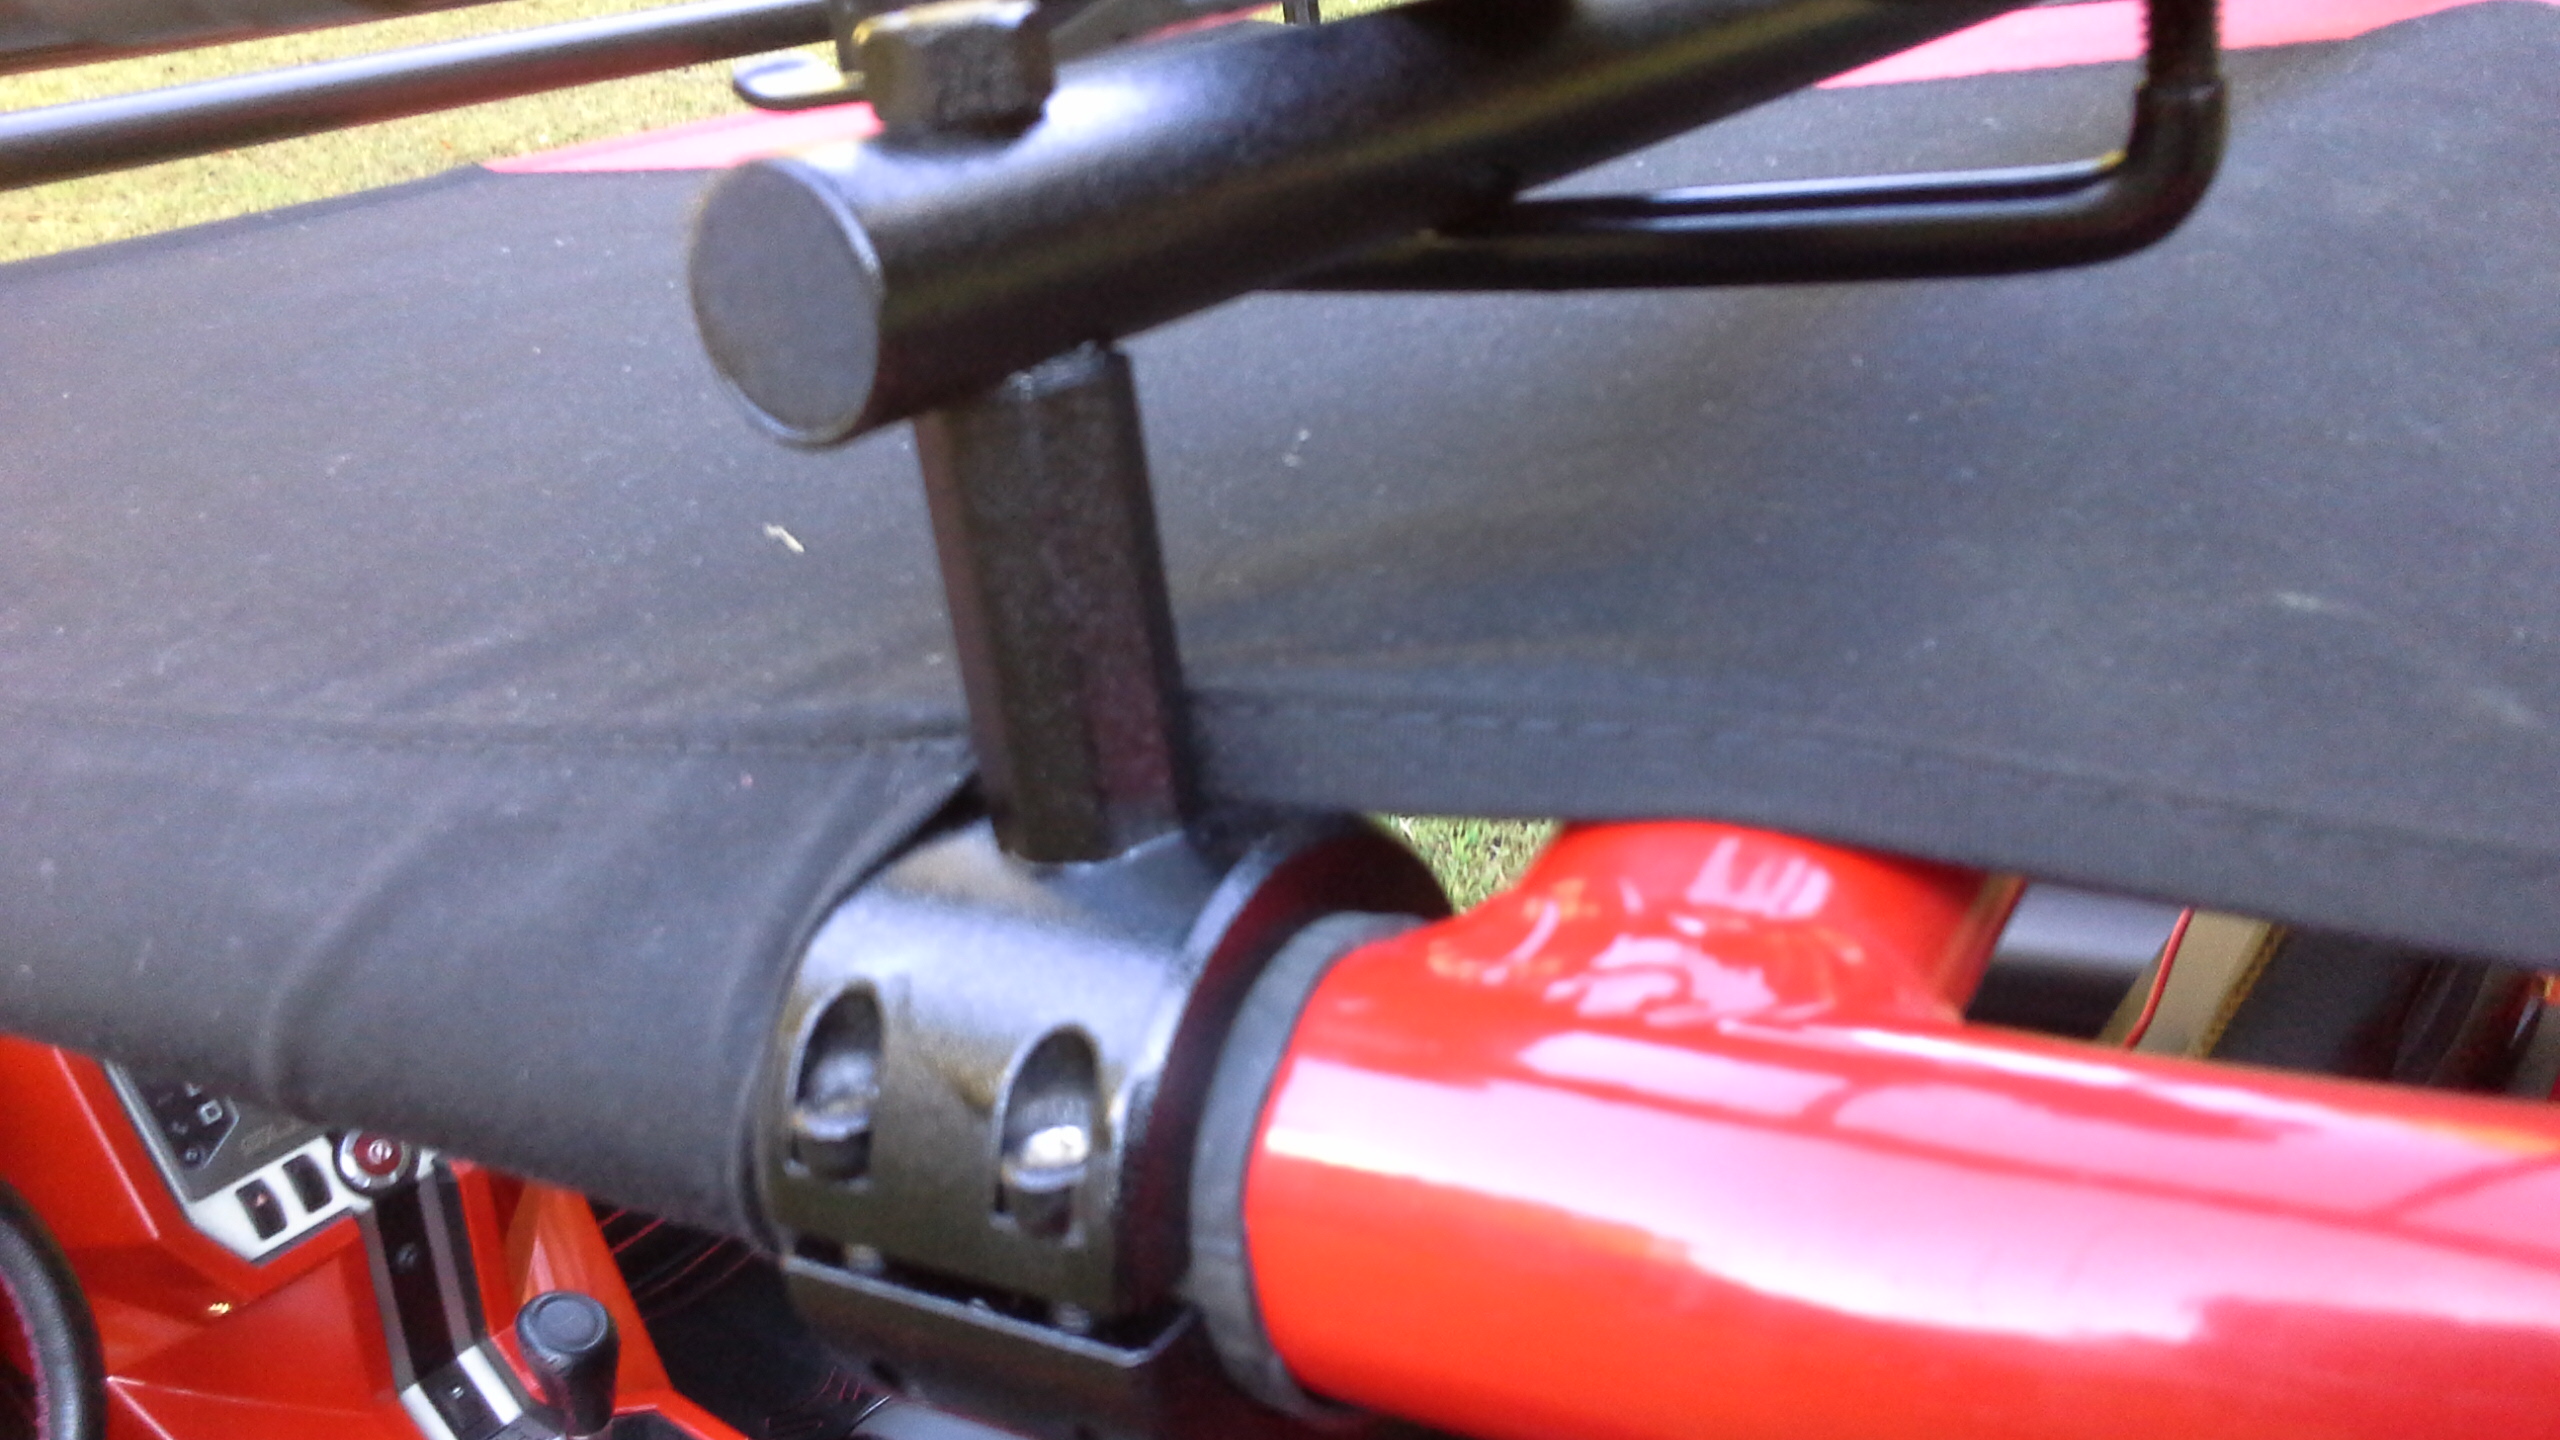
    Using a durable rubberized material, such as an inner tube from a tire repair, cut 4 strips approximately 1 3/4" wide x 6 1/4" long. This allows for a 1/2" overlap of the inner tube on itself. To make it easier; using electrical tape, make one wrap around the center of the inner tube to hold these to the rail. The tape will be covered by the mount. The inner tube should be positioned forward of the two crossbars, avoiding the frame welds. Now mount the clamps over the rubber to prevent marring of the Twist top frame. Tighten clamps evenly to the point that the mounts can be moved with some effort. Then using a level, align the threaded rods in the mounts to a straight / vertical position.


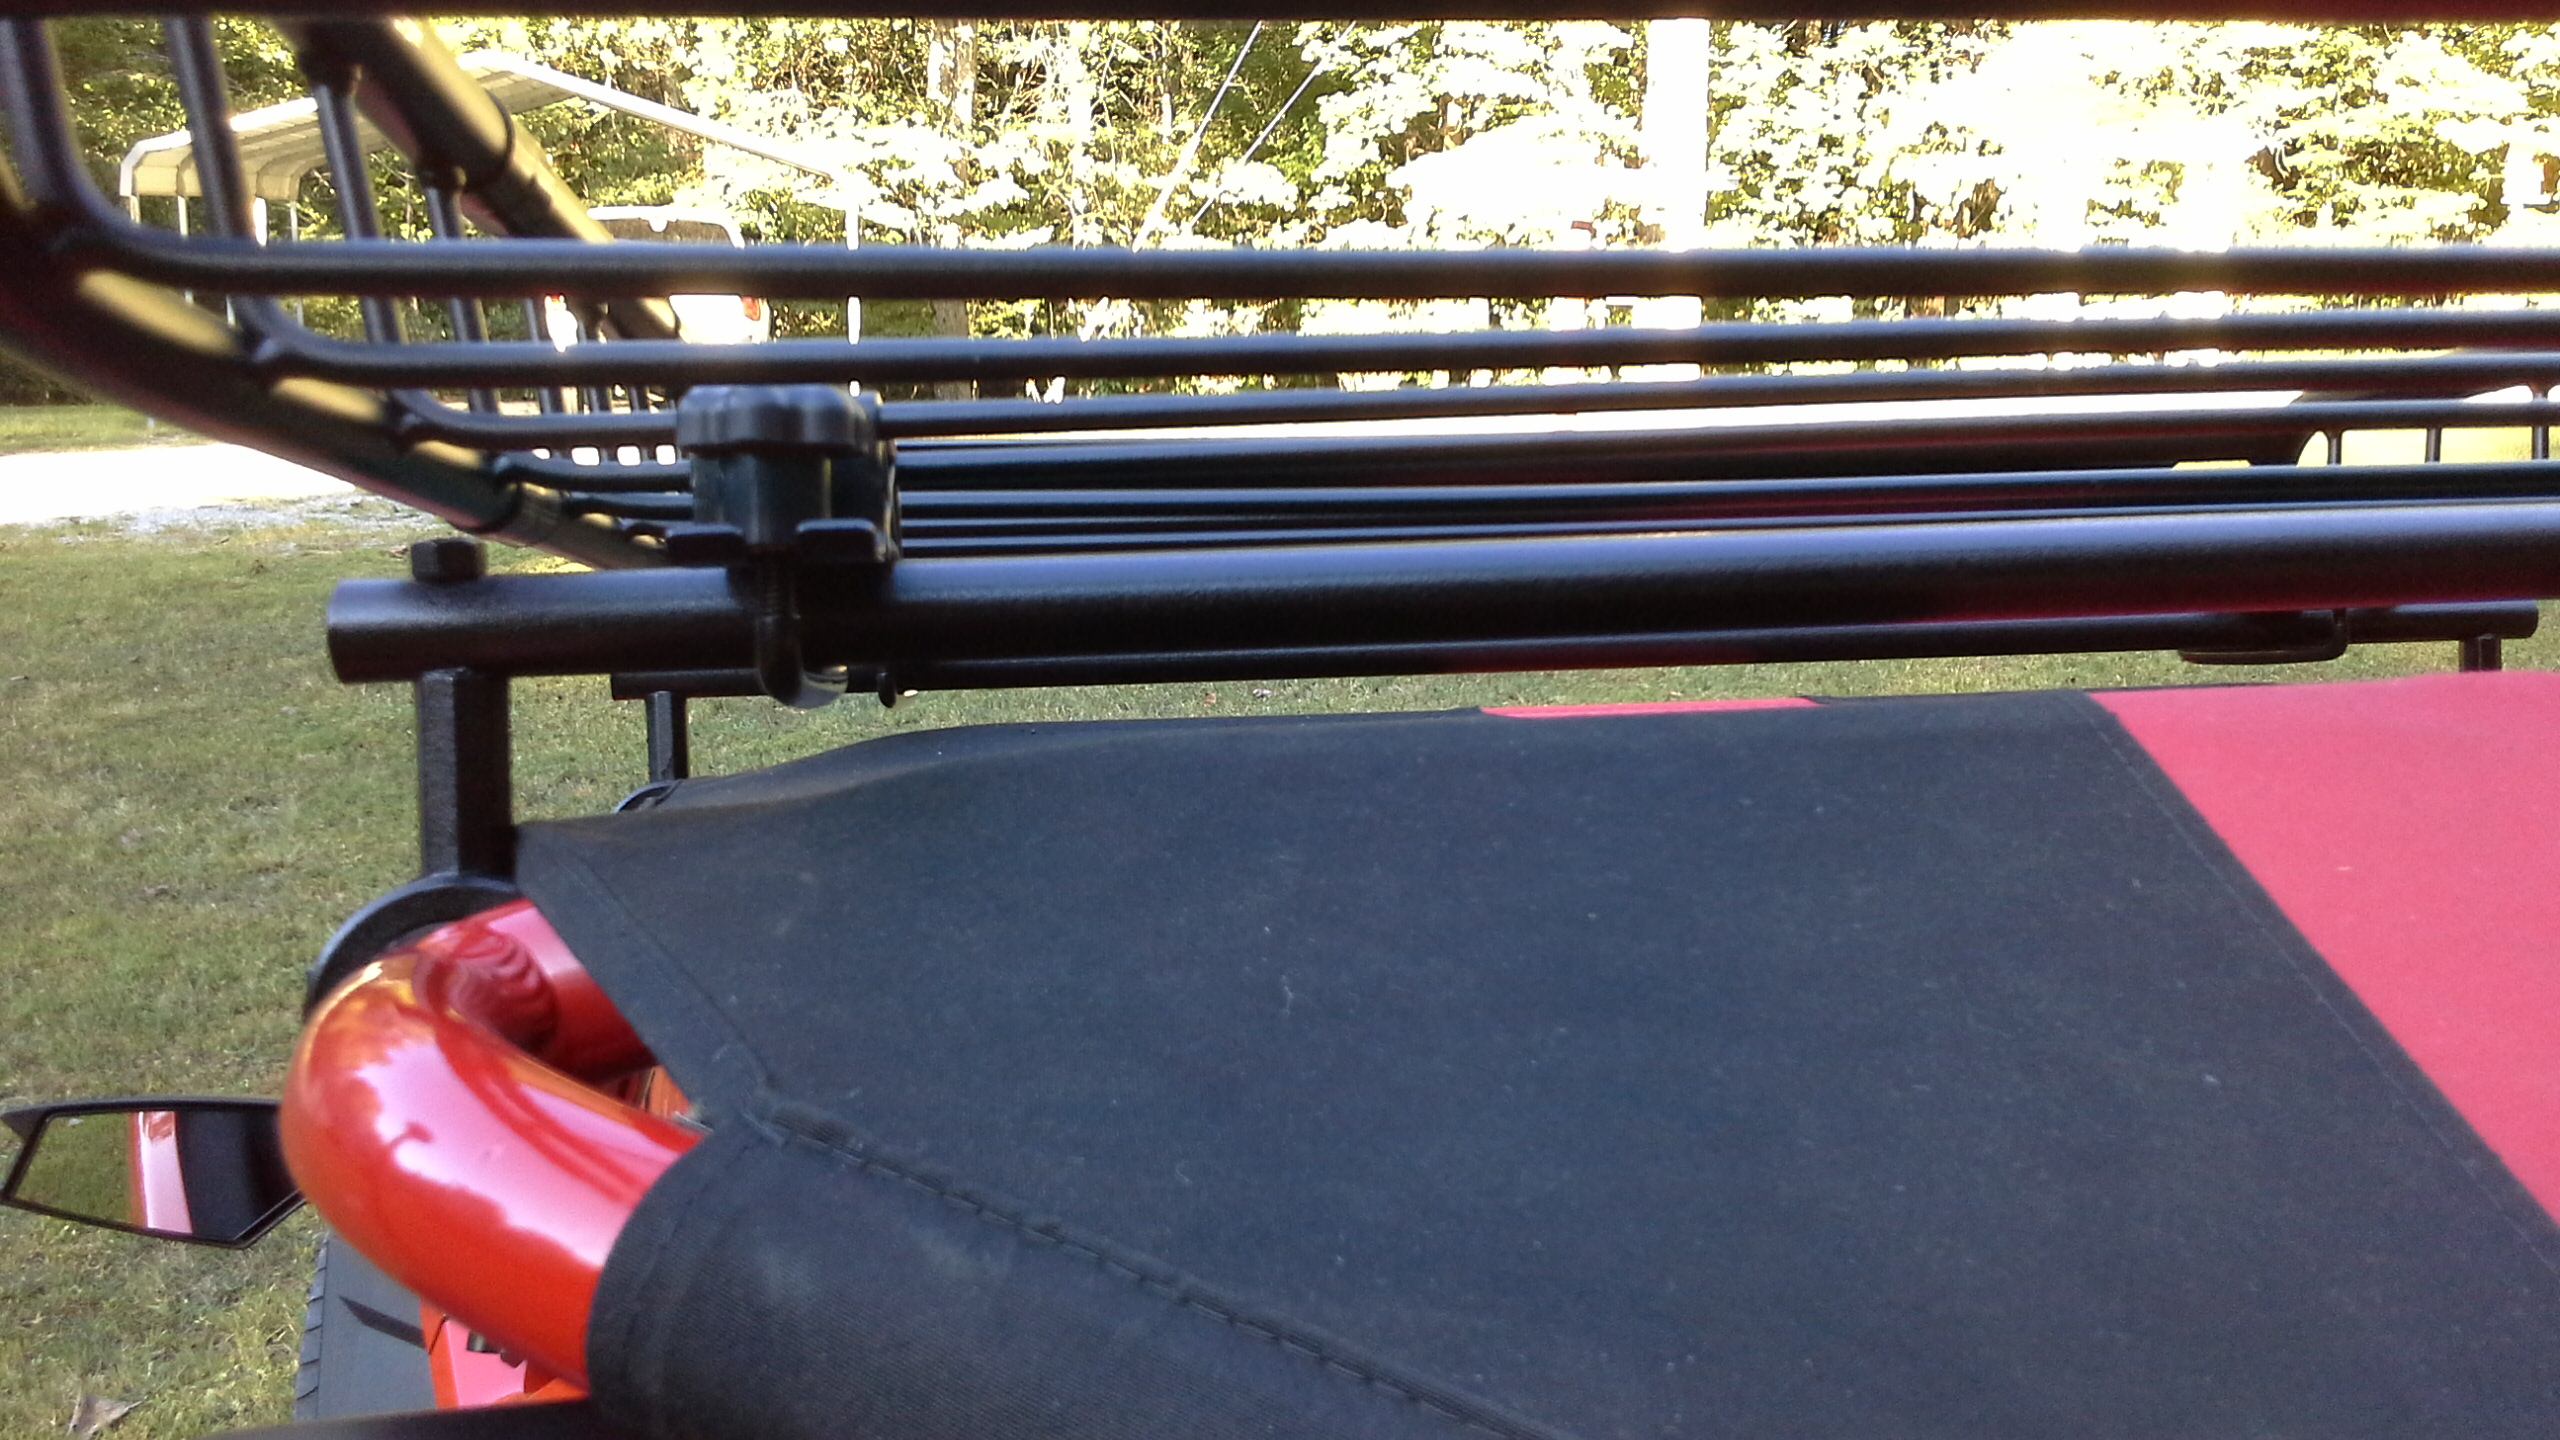
    5.) Measure The Distance -Left to Right- To Determine Distance Between Holes for Conduit / Rail:
    and the Total Lengths Needed for Next Cuts.
    Measurements should be taken at base of threads on the mounts.
    These were my measurements for drilling the conduit / rail for assembly to mounts:
    Front Conduit / Rail - Center of thread to Center of thread - 37 1/2"
    Rear Conduit / Rail - Center of thread to Center of thread - 33 3/4"


    You can make the conduit / rail any length you want.
    I decided to add an additional 1 inch to each end; preventing a protrusion that might cause injury.
    Front Conduit / Rail - 39 1/2" total length. Drilled holes 1" from each end of bar.
    Rear Conduit / Rail - 35 3/4" total length. Drilled holes 1" from each end of bar.
    I used an angle grinder to cut the lengths, then sanded the ends to remove burrs.


    To give the hollow conduit more strength at the assembly points, and prevent collapsed conduit; I installed a 7/8" wooden dowel 2" long into the cut ends. Added bonus: No Whistling From Wind! I flared the end of the conduit using a 1/2" drive socket extension. I placed the end of the conduit on a wooden block, then installed into the flared end, the socket extension and tapped with a hammer. This flared the cut ends of the conduit just enough for the wooden dowel to be tapped into place using a rubber mallet.


    6.) Drilling The First Hole of The Conduit / Rail For Assembly To Threaded Mounts:
    Find the center of the width for the conduit. Drill the hole in - straight and vertical. Do not use the same size drill bit as the threaded rods.. you will have fitment problems by doing so. Instead, use the next size larger. With the 3/8" threaded rod; I stepped up one size to a 25/64" drill bit.


    6.1) Drilling the Second Hole Of The Conduit / Rail For Assembly To Threaded Mounts:
    Crucial: The second hole must be perfectly aligned with the first hole drilled. Unfortunately, I failed to grab a picture of this the first time so this is a "mock" picture of what I did. Using a flat piece of wood, drill a perfectly straight / vertical 3/8" hole into the wood. Insert a piece of the left over 3/8" threaded rod into the hole you drilled into the wood. Now slide the first hole down the verticle rod and your second hole alignment will match to the first hole alignment.


    Slingshot Flyer! Well, of course it's red... :REDSS:

    Edited 9 times, last by airoutlaw ().

  • 7.) Setting The Height For The Conduit / Rails:
    Thread two more 3/8" x 16TPI nuts onto each of the threaded rods installed in clamps. You should now have 3 nuts total on each clamp mount. One to secure the threaded rods to the clamp, and the other 2 for conduit / rail assembly. Run one of the two nuts all the way down to the first nut you installed on the clamp mount. Now screw the top most nut about halfway down the threads.; this nut will help determine the final height at which the Reese Cartop Basket will sit when mounted to the conduit / rails.
    (Picture only shows 2 nuts installed, a premature shot)


    7.1) Install The Conduit / Rails:
    Align the threads on the clamps with the holes drilled through conduit / rails. Install the conduit / rails on top of nuts that were installed on each mount. Continue a mock fit- up and set the the basket atop the rails. Use the top nut the conduit / rails are sitting on, to raise or lower conduit / rails to reach desired height of the basket. Once you are satisfied with each of the four corners rail height positions; using a wrench to hold the top nut in place, use a second wrench to tighten the middle nut up against the top nut, which creates a jam nut to lock nut into place. This ensures the conduit / rails position will not move down the threaded rod mounts. At this point the conduit / rail should be in place atop the jam nut. Now, install a fourth 3/8" x 16TPI nut and tighten with wrench to finish locking conduit / rail into place. Be careful not to over tighten / crush the conduit.


    TIP: I opted to write " R " indicating the right side on the wooden dowels I inserted in the rail ends with a marker. Making installation once removed, a simplified process. After removing the rails, I used a small drill bit to make an indentation on the right side that will still be visible after painting. The clamps are slightly off-set to orient to the frame rails. The rails will only assemble one way.


    7.2) Cutting Excess Threading If Needed:
    If you have threads extending above the final top nut, you can at this point cut the excess threads off. You have two options: you can cut them off while it is mounted on the canvas top; the second option requires an additional disassembly and re-assembly. I opted for the second option. I did not want to the dust and metal shavings falling onto the slingshot, or in the cockpit to fly up in passengers eyes during rides, and - I could have maybe used a tarp to cover- but I preferred a more stable work space, with limited possibility of damage.
    I removed the bottom half of the clamp mounts, and pulled the entire assembly off. Once removed, I used an angle grinder with a cut off wheel to cut the excess threading off flush with the top nut.


    7.3) Re-Installing the Conduit / Rails - Post Excess Threading Cuts:
    The reason I had this additional step, was because I removed the assembly for cutting the extra thread off. Now, the clamps orientation has been fit- up correctly this far. If you loosen any of the nuts while the clamp mounts are not assembled in place on the canvas top frame- You will likely have to start back at positioning the cartop carrier again and leveling the 4 corners of the cartop basket. At this point I re-installed the entire assembly back onto the canvas top frame, tightened clamps hand tight into position and removed the 3/8" x 16TPI nuts. I then could remove the conduit / rails without loosing orientation of the clamps so that I could do the OPTIONAL step below.
    If you prefer to skip the optional step, then you can apply Loctite to the top of the threads and install acorn/ cap nuts. The Reese Cartop Carrier Basket does not allow for acorn/cap nuts to be installed on rear conduit / rail threaded mounts. The rear of the outer rails on the carrier sit in-line with the threaded mount. I had enough space for the 3/8" x 16TPI to be installed on the rear threaded mounts. I used the acorn/cap nuts on the two front threaded mounts. I applied Loctite after I completed optional step.


    8.) OPTIONAL - Installing PVC Pipe To Cover Threaded Rods And Nuts:
    I wanted a cleaner look than the exposed threaded rods and nuts. I decided to cut PVC pipe to use as a sheath to cover the threads and nuts. This is a step that can only be done after adjustments and the fit- up are completed. To do this, remove the basket, and the four
    3/8" x 16TPI nuts installed atop the conduit / rails used for the mock fit-up, and then lift off the conduit / rails. Measurements for the PVC Pipe cuts will be taken from the base of the threaded mounts - to the top of the double nuts the conduit/ rail rests on. My measurement was 1 5/8" based on a 3" threaded rod. I added sealant to prevent any wind whistling during travel and to seal off the threaded area.


    (This picture is out of sequence, I did not remove the clamp at this point. Pic is to show where I added sealant and the PVC sheath cover You can also see the "R" marked, with a drilled indention here.)


    9.) Preparing For Final Assembly:
    For those that opted to cover the threaded rod with PVC sheathing, the next step for you is to re-install the conduit / rail, Loctite to top of threaded mounts, acorn/ cap nuts to the front threaded mounts, and the 3/8" x 16TPI to the rear threaded mounts.
    Just to note - You might be asking, " why does he install , uninstall, then re-installed?" The answer is: FIT-UP. It is easier to address any fit-up issues as they arise; rather than finishing cuts, and paint- only to find your position is off, or something doesn't meet your approval.


    10.) Prepping For Paint:
    Remove the cartop/ rail assembly - loosen and remove bottom of clamp mounts from the canvas top frame. The bottom of the clamp mounts are the only pieces you will disassemble from this point forward. I assembled the mount together, leaving a space between the two halves, suspending them by threading wire around the clamp bolts.


    We took it for a test drive before paint- 75MPH to check for whistle, noise, or audible vibrations. No issues- No sound effects.


    10.) TRIPPING!
    With paint dried, and fit-ups complete, I plan on permanently installing the Reese Cartop Carrier Basket to the Cartop / Rail assembly. When the wife and I take a road trip, we can and will remove the entire Cartop Carrier/ Rail assembly once we arrive at our destination to store until our departure in our Hotel room. We will only be using it for trips. Walmart is considered a trip by the wife... I have already informed her, I will not be using this to make "trips" to Walmart...unless it's Walmart in Eureka Springs, Arkansas. Otherwise it will be hanging in the garage as one piece until needed for a road trip.

    Slingshot Flyer! Well, of course it's red... :REDSS:

    Edited 8 times, last by airoutlaw ().

  • This means: instead of only being able to pack clothing for a couple days, when the trip is a week long... Having to pack washing powders and make sure the places we stay has a laundry facility so we can do laundry while on vacation..... WE CAN ACTUALLY VACATION ON OUR VACATION! I can't wait for you to post the finished picture.... most people pay good money to have this type of work done... most people, including myself- wouldn't attempt or know where to start from scratch. If left up to me, I'd still be staring at the canvas top - scratching my head ! :S


    THANK YOU @airoutlaw ! :00009249:

    All statements, posts, and general discussions made on this forum by me purposely reflect my opinions and personal experiences. 8)

  • Wow!! That is an awesome detail of how you took your concept to the finished product!! :00007555:
    Methinks you will be inundated with requests for purchasing these.


    Nice job and thanks for sharing @airoutlaw!! :thumbsup:

    Those who will give up essential liberty to secure a little temporary safety deserve neither liberty nor safety


    2016 Slingshot SL Vin# 8855 (born in September 2015) w/ Alpha Stage 2 Turbo @ 7.5psi

  • As promised, here are the pics... I know the forum rules - no pics, didnt happen!


    Slingshot Flyer! Well, of course it's red... :REDSS:

  • I think @airoutlaw forgot to mention WHY he didnt just purchase the rail system designed for the Reese rack.... Well, he did buy it. Thought it would work by the dimensions and descriptions provided on the box, and worst case scenario would be he would have to modify the rails a bit... the rail mounts on the Reese did not grip to larger diameter of the canvas top frame. It would not secure, and there wasn't any modifications he could do that wouldnt create other issues... so he decided to return the Reese rails, and brainstormed from scratch. I know this is totally off point- but this is the reason why I fell in love with him. Any problem I have, any household item fails... most people throw them out and buy new ones.. most people turn their small engines in to a shop and have them fixed... whether its a blender, a vacuum, small engine, rebuilding a computer (including formatting drives and re-installing an operating system on a new gaming computer) building massive windmills, elaborate birdhouses, even fixing my sewing machine in minutes- when i had fiddled with it for nearly 4 hours... I don't have to tell you, but I'm very proud of my husband :00009419: ok, enough mushy mushy... sorry.. BACK TO SLINGING LUGGAGE!

    All statements, posts, and general discussions made on this forum by me purposely reflect my opinions and personal experiences. 8)

  • I think @airoutlaw forgot to mention WHY he didnt just purchase the rail system designed for the Reese rack.... Well, he did buy it. Thought it would work by the dimensions and descriptions provided on the box, and worst case scenario would be he would have to modify the rails a bit... the rail mounts on the Reese did not grip to larger diameter of the canvas top frame. It would not secure, and there wasn't any modifications he could do that wouldnt create other issues... so he decided to return the Reese rails, and brainstormed from scratch. I know this is totally off point- but this is the reason why I fell in love with him. Any problem I have, any household item fails... most people throw them out and buy new ones.. most people turn their small engines in to a shop and have them fixed... whether its a blender, a vacuum, small engine, rebuilding a computer (including formatting drives and re-installing an operating system on a new gaming computer) building massive windmills, elaborate birdhouses, even fixing my sewing machine in minutes- when i had fiddled with it for nearly 4 hours... I don't have to tell you, but I'm very proud of my husband :00009419: ok, enough mushy mushy... sorry.. BACK TO SLINGING LUGGAGE!

    Is @sideseatdriver his sister? Asking for a friend! Eh @KayTwo


    Tim "Ghost" Ganey
    Winfield, Alabama
    205spam412spam2868

  • This is absolutely the reason I read as many posts as I can on this forum!!!!! I will do the exact same this this winter. I am in same boat with my top. We love love love it. I want to extend a sincere thank you to airoutlaw for taking the time to post this in such great detail.

    2018 SLR LE
    Bullet Speed Top

    Hawk 5.0 Pads


    My girlfriend loves SS more than me but can't drive a manual laugh-squaredlaugh-squared Lucky me!!!

  • @Wrenchmn, I cannot take any credit for this. I was at work during this entire process. He took the pictures, while working this project, did the scavenging for parts..and fed himself, I didnt even make him a sandwich. :/
    Hoping the "Little Red Hen" storybook doesnt play out when I go to pack my half of the rack... else I'll just have to hold my 4.3 cubic feet / rooftop duffle bag in my lap across 2 states for 800+ miles... :cursing:

    Is @sideseatdriver his sister? Asking for a friend! Eh @KayTwo

    Nope.... but me and @KayTwo might be each others long lost kinfolk!

    All statements, posts, and general discussions made on this forum by me purposely reflect my opinions and personal experiences. 8)

    Edited once, last by Guardian_Angel ().

  • @Wrenchmn, I cannot take any credit for this. I was at work during this entire process. He took the pictures, while working this project, did the scavenging for parts..and fed himself, I didnt even make him a sandwich. :/
    Hoping the "Little Red Hen" storybook doesnt play out when I go to pack my half of the rack... else I'll just have to hold my 4.3 cubic feet / rooftop duffle bag in my lap across 2 states for 800+ miles... :cursing:

    Nope.... but me and @KayTwo might be each others long lost kinfolk!

    One thing is for sure, I'd be glad to call him and several more here on this forum kinfolk where it be by blood or not. Lots of good folk here!


    Tim "Ghost" Ganey
    Winfield, Alabama
    205spam412spam2868

  • @Wrenchmn, I cannot take any credit for this. I was at work during this entire process. He took the pictures, while working this project, did the scavenging for parts..and fed himself, I didnt even make him a sandwich. :/
    Hoping the "Little Red Hen" storybook doesnt play out when I go to pack my half of the rack... else I'll just have to hold my 4.3 cubic feet / rooftop duffle bag in my lap across 2 states for 800+ miles... :cursing:

    Nope.... but me and @KayTwo might be each others long lost kinfolk!


    That being the case even more KUDOS to @air outlaw for incredible solo development and implementation.


    Sent from my iPhone using Polaris Slingshot Forum mobile app

  • Folks ..
    After a discussion with @airoutlaw, I asked him to elaborate here with the details, but he is classier than I am. With that said, I'm going to give classy an old college try....


    DO NOT USE: Aluminum Alloy clamps which are rated for LED Work lights, roof basket FAIRINGS, or LED Light bars for your truck... these are NOT rated for heavy loads such as LUGGAGE.


    Furthermore, the diameter of the aftermarket top frames for both bulletspeed and twist dynamics is 1.66 inches in diameter. Which means, your clamp needs to be able to at LEAST extend to the frame diameter that you are clamping.


    Aluminum stresses and bends. Failure is imminent.


    YOU GET WHAT YOU PAY FOR FOLKS.

    All statements, posts, and general discussions made on this forum by me purposely reflect my opinions and personal experiences. 8)

    Edited once, last by Guardian_Angel ().


  • There ! Now I can thank you for your viable contribution for this project. Great observation and contributions.


    Sent from my iPhone using Polaris Slingshot Forum mobile app

  • Its good to give people options. There's more than one way to skin a catfish... I could use my teeth... that is a viable option. It's a pretty good one - if I was starving to death and had no other options. :00000021:

    All statements, posts, and general discussions made on this forum by me purposely reflect my opinions and personal experiences. 8)