How to make your hood "middle section" removable - by R-Shot Accessories

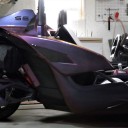
  • Here is are the details with links to the products. The process of uninstalling the grey hood and the black hood wings took the longest. After removing the black wing panels (used Painter) video. I used an "Dremel like" cutting tool/wheel. To separate the two areas. Came back and cleaned it up with a box knife and smooth file. Did this on both sides - the removable hood piece and the piece that stays in place. Installed the pieces back and used black calking around the edge of the black hood wings. That gave it a finished factory look. Turning my attention to the hood piece that is removable, I did the same trimmed and filed smooth the edges down both sides. Finished it off with automotive trim that is around door seals. Another nice finished look and it will not scratch the "in place hood" when you install it back and forth.
    Added the pin lock...this took some time as I had to be super accurate - I measured it 6 times and used the supplied template.


    I recommend you watching these videos...its priceless in getting it done without damage to your SS


    Items needed...
    Pin Hood for center
    https://www.amazon.com/gp/prod…age_o04_s00?ie=UTF8&psc=1
    See pics


    Several ways to do the hood attachments - but I choose these. Pretty simple installation.
    https://www.amazon.com/gp/prod…page_o07_s00?ie=UTF8&th=1


    Extra bands because these can break over time:
    https://www.amazon.com/gp/prod…age_o01_s01?ie=UTF8&psc=1


    Please note that you can also use very small bungee cords with the small ball. These will not break and may last longer.
    https://www.amazon.com/gp/prod…age_o00_s00?ie=UTF8&psc=1


    The trim used on the removable hood;
    https://www.amazon.com/gp/prod…page_o03_s00?ie=UTF8&th=1


    Next, as an added security I added these pins that go underneath hood to ensure the hood will not come flying off at 1000 mph HEHEHEhehehe
    https://www.amazon.com/gp/prod…page_o05_s01?ie=UTF8&th=1
    These go in the holes that are no longer being used..... in Painters video he shows you the 4 screws down the side that must be removed ...I used two of those holes on each side to help ensure it stays on.


    After all of that... I started to work on the Grill "Look". About a year ago @WraithSS showed me how to do the front grill using wood pattern as a mold and bending and stretching the Alum. Grill around it to form practically any shape you want. I applied the same process to this.
    Page Error 404 - customcargrills at Custom Grills has a great deal of grill patterns...pick one at an affordable price!!
    See Pics


    And the Wrap... WraithSS...handled. The Wrap was a pain in the Azz. The angles on the hood are crazy and it takes a lot of time. You may get a crease or bubble here or there but the overall look is VERY good and worth the time.
    All in all about 13 hours of work - but I broke it up over two days with WraithSS help.
    And as you all can tell I am an Amazon shopper....Need stock in this place!


    Final look:


  • Oh my freak'n word, I need a cigarette after seeing this. Couple questions, how did you determine or measure for the center hood latch? does the automotive trim run the whole length or just the section you cut?

  • Oh my freak'n word, I need a cigarette after seeing this. Couple questions, how did you determine or measure for the center hood latch? does the automotive trim run the whole length or just the section you cut?

    The trim only goes to the area I cut/removed. If you place all the way down a side...it will not fit properly and rises up in the front about an 1/4" - kind of looks like a gap between the panels.


    The Pin was a little tricky. I first installed the Pin in the hoods "belly button" and then lined up the template that comes with the kit. Ensured that pin latch housing underneath would clear and close properly. Made a few marks with tape on the belly button and then I placed TOOTHPAST on the top of the Pin and gently set the hood in place.... the toothpaste gave me my exact mark underneath the hood. Using a ice pick or something like that...press hard into the hood so that you see it on the front of the hood. Now grab that template that came with the kit and line it up....Perfect dead on...now your ready to cut the hood after you mark it and tape it off so your saw does not damage the hood.


    This evening I will take pics of the template and you will see its NOT that difficult. I can lay the template down on the belly button - once you see it in the pic...its like "ohhhh okay to easy"


    WE WERE ALL HUMANS UNTIL
    RACE DISCONNECTED US,
    RELIGION SEPERATED US,
    POLITICS DIVIDED US,
    AND WEALTH CLASSIFIED US.

  • Thanks for sharing such an awesome mod!!! And as I said before..... FRICKIN WOW!!!! :00007555::00000436:


    I'll be looking forward to seeing the video of opening, removing, and closing the hood!!!

    Those who will give up essential liberty to secure a little temporary safety deserve neither liberty nor safety


    2016 Slingshot SL Vin# 8855 (born in September 2015) w/ Alpha Stage 2 Turbo @ 7.5psi

  • Oh my freak'n word, I need a cigarette after seeing this. Couple questions, how did you determine or measure for the center hood latch? does the automotive trim run the whole length or just the section you cut?

    Here are the pics I wanted you to see. Notice the template "cross hairs" to center the Hood pin for clearance. You can also flip the hood latch to gain even more clerance. Once the pin location is in and you make the height adjustment so the latch will engage.


    WE WERE ALL HUMANS UNTIL
    RACE DISCONNECTED US,
    RELIGION SEPERATED US,
    POLITICS DIVIDED US,
    AND WEALTH CLASSIFIED US.

  • That is cool as hell. Great job. Holy crap is that awesome


    Thanks for sharing such an awesome mod!!! And as I said before..... FRICKIN WOW!!!! :00007555::00000436:


    I'll be looking forward to seeing the video of opening, removing, and closing the hood!!!


    Man you are killing me @lrobbi. I am actually considering this. The possibilities of messing up one of painter's works of art terrifies me. Might have to meet up to do this one.


    @lrobbi Sir this one is for you.
    Cause you must have them.....again great job!


    thanks guys I really appreciate the comments.


    @Slingrazor brother if you need a hand I am more than willing.


    WE WERE ALL HUMANS UNTIL
    RACE DISCONNECTED US,
    RELIGION SEPERATED US,
    POLITICS DIVIDED US,
    AND WEALTH CLASSIFIED US.

  • Yesterday while riding with the DMV/Wrecking Crew ... after we broke bread with our brother @AndyHatch - I was able to get on SHOT and push it up to 85mph to see how the hood performed. No vibration but it had about 1/8" lift from the air coming under and through the front grill. But results was fine. I can add another set of the quick release fasteners and I know that would keep it solid at higher speeds.


    WE WERE ALL HUMANS UNTIL
    RACE DISCONNECTED US,
    RELIGION SEPERATED US,
    POLITICS DIVIDED US,
    AND WEALTH CLASSIFIED US.

  • Had a little snow last night. Gone by mid morning but the freak'n town put salt down. My riding season is done. I won't ride with salt on the road. That stuff will destroy the sling. Ordered my parts for the hood mod. :thumbsup: Getting her ready for the hood mod, then prepping for new paint. I'm airbrushing flames on the hood and thinking about putting them on the frame of the hood as well. So when the center hood is off, I can continue the look. Then carbon fiber wrap stuff happening. Using some gloss white and gloss black. Not a clue about doing any of it, but what the heck. I'll fake it, :D